Wednesday, September 23, 2015

Mini quiche


Greetings! Whaddya know? Another post!! I've been home this past week, so there has been a bit more cooking and experimenting going on, and when there's cooking there are blog posts!!

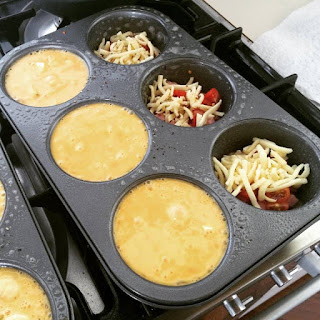
Today, I decided I wanted to make The Boy some mini quiches for him to take to work for lunch or reheat to have as breakfast during the week. He's been having a lot of cereal and I thought I'd break it up for him a bit. Something different for a change.

I saw this recipe for the mini quiches on Facebook (don't we pretty much see everything on Facebook these days?) and decided to save it. Finally pulled it out today to make.

Here's the original recipe

Ingredients:
  • Spring onion as required
  • Chopped tomatoes as required
  • Onion as required
  • Cheese as required
  • Green Capsicum
  • Fresh coriander
  • You can add chicken or other lean meats, spinach, ricotta cheese, bacon, and lots more as per your taste.
  • Eggs x 6 - beaten with 2 tbsp milk, salt and pepper to taste

Instructions:
  • Preheat oven at 200°C
  • Grease your mini muffin tin
  • Add vegetables of your choice along with cheese (if you choose), pour beaten egg mixture on it.
  • Place muffin pan on the center rack of a preheated oven and bake for 20-25 minutes or until muffins are light brown, puffy, and the eggs are set.
  • Let muffins cool for a few minutes before removing from the muffin pan or cups. Loosen gently with knife if they seem to be sticking. Eat immediately or let cool completely and store in plastic bag in refrigerator or freezer. The Egg Muffins can be reheated in the microwave.


As you can see the recipe only asks for 6 eggs. That's not a lot of eggs. I was using muffin tins rather than mini muffin tins, so I got 6 mini quiches to a pan and I made 2 pans, 12 mini quiches. My muffin tins are individually quite large and it surprised me but each muffin well took 2 eggs. I started off the batch with only making up 6 eggs and quickly found that 6 eggs got me 3 mini quiches. I ended up using 24 eggs to make 12 mini quiches. I tell you this because you may have to adjust the number of eggs you use depending on the well size of your muffin tins.

Note: if you use mini muffin tins, your mini quiches will come out bite size.

For fillings, I got quite creative and frugal as well, rummaging through my fridge to see what I had. I ended up with quiches that had:

  • Ham bits, tomato & feta (I was trying to use up some feta)
  • Ham bits, tomato & cheddar (I ran out of feta)
  • Mushrooms, green capsicum & feta
  • Mushroom, tomato & feta (I ran out of green capsicum)

You can pretty much put in whatever filling you want.

I also used thickened cream rather than milk. The cream just gives it a slightly richer texture but milk is just fine too.

I gave the muffin tin a good spray of cooking oil before putting the ingredients in. Worked a treat. The mini muffins slipped right out. No muss, no fuss.

I'm delighted with the results. Already The Boy is saying he wants to have them for breakfast tomorrow rather than waiting till next week when he goes to work on Monday. We're heading to a wine and vineyard masterclass for the day and we've been told to bring full stomachs to soak up the alcohol we will be tasting. :-)

I hope you enjoy this recipe. It's super simple.

Let me know if you decide to make this. I'd love to see your results. Post a picture and tag me on Instagram or Twitter. :-)


Find Deanna around SOCIAL MEDIA:
blogger  blogger  rss  facebook  twitter  instagram  email  youtube  pinterest  google+  goodreads

Tuesday, September 15, 2015

Stovetop pizza


Yes, I admit, it has been a very long time since I've written a food post. Shame on me! The reason? Since December of last year, we have been hopping between the city and The House in the country.

Originally, we were in a service apartment and did a little bit of basic cooking, but it was difficult what with me not being in my own kitchen, with all my own spices, tools and equipment.

Then we moved into a small, basement apartment (it was cheaper!) and this one has NO kitchen. I have a small electric hot plate that I use occasionally for soup and ramen noodles, and that's it. There has been no cooking in that apartment.

We're home for the week and I'm living it up by cooking up a storm.

I found this recipe on how to cook a pizza on the stovetop on Facebook and thought I'd try it. I always love an easy way to make the dough for pizza.


Here's the recipe for the pizza:

Ingredients:
  • 1/2 cup self raising flour
  • 1/2 cup plain flour
  • 2/3 cup warm water
  • Pinch of salt
  • 1 teaspoon honey
  • 1 teaspoon dry yeast
  • Pizza toppings

Instructions:
  • In a large flat based, vertical sides fry pan, mix base ingredients all together and level out in pan
  • Top with toppings - tomato sauce, cheese, etc.
  • Cover with lid or tin foil (if you don't have a lid) for 5 minutes, with vents shut. Cook on medium heat
  • After 5 minutes, open vents or put slits in the tin foil to vent it, cook for another 12 minutes
  • After 12 minutes, take it off the heat
  • Turn grill on high and put pan under the grill for 5 minutes to brown the tops of the cheese (the cheese melts and gets gooey but doesn't brown in the pan)
  • Once the cheese has browned, remove from grill, leave to cool for a couple of minutes, then slice and serve
  • Enjoy

I learned a few things about making this pizza and I thought I'd share it with you:

  • It's as tasty as you want to make it, cos you can pretty much put whatever toppings you like on it.
  • You can put the toppings right to the edge and it cooks without spilling over because of the sides of the pan. Very nice. I like that a lot.
  • The original recipe says 10 minutes vented, I did 12. I think it cooked it better. Also, if you put a lot of cheese (which I did!) it may take longer to melt all the cheese.
  • The original recipe doesn't say anything about putting the pizza under the grill to brown the cheese, that's something I like to do.
  • The pizza tastes more like a deep dish pizza in texture rather than a thin crust pizza but I liked it.
  • The video (see below) recommends you buy their pan, but seriously, the pan is over $200. I made do with my own non stick pan.
  • The video doesn't say, but you want to cook on medium heat.
  • Do not heat the pan prior to mixing ingredients. Do not mix ingredients over heat. Mix ingredients first, then put it on heat.
Will I make this again? Yes, I will. I liked it a lot. I particularly like the idea of making my own dough in a no fuss kind of way.

If you don't want to follow the written recipe above, you can also watch the Facebook video:


Let me know if you decide to make this pizza. I'd love to know how you did. Post a picture and be sure to tag me on Instagram or Twitter to I can see what you made.


Find Deanna around SOCIAL MEDIA:
blogger  blogger  rss  facebook  twitter  instagram  email  youtube  pinterest  google+  goodreads

Wednesday, May 27, 2015

Slow cooked Thai chicken curry soup


I have been very slack on the cooking blog front for two reasons. (1) I went back to some temporary full time work, helping out my ex-boss as he looked for a new assistant and (2) I have been living in an apartment with no kitchen and cooking facilities, hence much less cooking. Between the two, there has only been some intermittent cooking on weekends and next to no experimentation. My sincere apologies.

I do, however, have a post for you today.

This weekend, we managed to head home to spend 3 days which was glorious as I got to sleep on my own bed, which felt fantastic.

We also have a couple of nights home and I felt energetic enough to cook though I felt like I was coming down with the flu. The Boy has had the flu for a week and he has been very poorly. I think I caught it but started dosing myself with the doTerra oils "flubomb" and quickly overcame it. More on that in another post.

So, for dinner on Friday night, The Boy, who has been sick, always likes something hot and spicy to give a little zing to his little germ bugs.

I saw my friend Suzie post a picture of this Thai chicken curry soup which she found somewhere on Facebook and I really have no way of pointing to the original source. This looked delicious though, so I decided to make it. Plus, it's slow cooked, which is a bonus cos it usually means that it will be easy to prepare and I was not up to a complicated meal.

Here's the RECIPE for the dish:

Ingredients:
  • 2 Onions (Browned )
  • 8 Chicken Thighs (Browned)
  • 1 Carrot Thinly sliced (Roasted)
  • 2 Red Capsicums Thinly sliced (Roasted)
  • 6 Teaspoons of Minced Garlic
  • 6 Teaspoons of Ginger
  • 6 Fresh Mushrooms Sliced
  • 1 Can of Coconut Milk
  • 1 Bunch of chopped up Basil
  • 3 Heaped Teaspoons of Red Curry Paste 
  • 4 Cups of Chicken stock
  • 3 Tablespoons of Fish Sauce
  • 3 Tablespoons of Lime Juice
  • 2 Tablespoons of Raw Sugar

Instructions:
  • Brown onion in a pan
  • Brown thinly sliced chicken thighs 
  • In a large bowl mix garlic, ginger, fish sauce, sugar, stock, curry paste.
  • Put in slow cooker, chicken and onion pour the sauce over 
  • Cook for 4 Hours on high or 7 hours on low
  • Roast up capsicum and carrot
  • 1/2 an hour before serving stir into slow cooker, roasted capsicum & carrot, chopped basil, mushrooms, 1 can of coconut milk
  • Just before serving stir in lime juice !!

Explodes with Flavor !
Serve with Crusty Bread

Of course, I never follow the recipe exactly. I forgot to buy 2 red capsicums, so I ended up with only one.

I had about 5 carrots left in the fridge, so I used them all up.

I bought a small punnet of mushrooms, about 250g and rather than have a bunch of mushrooms leftover, since I was not cooking the rest of the week I decided to use them all. I also didn't slice the mushrooms but halved them instead as I wanted something chunkier to chew on for the soup.

I was very generous in my heaped tablespoons of red curry paste. :-)

I added 3 fresh chilis which I sliced up and added to the stock mix to slow cook for a little added zing and flavor.

I did roast the carrots and capsicum but I don't think I'll do that again next time. I think it doesn't make that much of a difference between roasting and not roasting in this instance because there is already so much flavor from the soup mix.

I didn't slice the chicken too thinly because I knew that the chicken pieces needed to be fairly large as they would fall apart in the cooking after being in the slow cooker for such a long time.

I cooked my soup on high for 3.5 hours and then added the last ingredients and cooked it on high for another 45 minutes. That seemed to have worked well in terms of integrating all the flavors and the chicken meat was very tender.

This turned out to be a very flavorful soup which was bursting with flavor. It's not a spicy soup either, so even if you can't handle heat, you would still be able to make it and enjoy a very tasty soup.

Add some noodles to it and you will have a Thai curry laksa.

A big thank you to my friend Suzie for the recipe.

If you do make this, be sure to post pictures for me to see either on Instagram - be sure to tag me with @langshipley or on my Daz In The Kitchen Facebook page.

© This work is copyrighted to Invest-Ex and Destiny's Fortunes Pty Ltd


Find me around SOCIAL MEDIA:
blogger  blogger  rss  facebook  twitter  instagram  email  youtube  pinterest  google+  goodreads


Wednesday, April 29, 2015

Feta, avocado and tomato salad with smoked salmon and dill as a starter / entree


I have previously posted this recipe here but this is a slight more fancy variation on the same salad.

I like to make this salad for a starter whenever we have company over, especially on the hotter Summer nights.

Here's the recipe again but also with the variations that I've made.

Ingredients:
  • 1 ripe avocado, halved and stoned
  • 2 tbs dill, finely chopped
  • 1 tbs mint leaves, chopped
  • Sea salt and pepper
  • 1 tbs lime or lemon juice
  • 100g feta cheese, crumbled
  • Half a red onion, finely sliced
  • 100g cherry tomatoes, halved
  • 2 teaspoons of mini capers
  • 2 tbs extra virgin olive oil
  • Extra dill or mint for serving
  • 200g smoked salmon

Instructions:
  • Roughly chop the avocado with a fork, but don't make it completely mushy. Place into a bowl with 1 tablespoon of chopped dill, mint, salt, pepper and lime or lemon juice. Put in the crumbled feta and lightly toss it all together. Check the taste and add more salt and pepper if necessary.
  • Put the cut tomatoes in bowl and add the sliced red onion to it. Mix with the olive oil, salt and pepper.
  • Take the smoked salmon out of the package and cut into small bite size pieces. Mix through with the remaining tablespoon of chopped dill and capers.
  • Once all three components are ready, set out the number of plates that you are serving this for and place on generous spoon of each heaped onto the place (like the picture above) in the shape of a triangle.
  • Serve and enjoy!
Note: this recipe serves 4 people.

This presents a very pretty plate for a starter but is also very refreshing and tasty.

If you do make this, be sure to post pictures for me to see either on Instagram - be sure to tag me with @langshipley or on my Daz In The Kitchen Facebook page.

© This work is copyrighted to Invest-Ex and Destiny's Fortunes Pty Ltd


Find me around SOCIAL MEDIA:
blogger  blogger  rss  facebook  twitter  instagram  email  youtube  pinterest  google+  goodreads