Greetings! Whaddya know? Another post!! I've been home this past week, so there has been a bit more cooking and experimenting going on, and when there's cooking there are blog posts!!
Today, I decided I wanted to make The Boy some mini quiches for him to take to work for lunch or reheat to have as breakfast during the week. He's been having a lot of cereal and I thought I'd break it up for him a bit. Something different for a change.
I saw this recipe for the mini quiches on Facebook (don't we pretty much see everything on Facebook these days?) and decided to save it. Finally pulled it out today to make.
Here's the original recipe
Ingredients:
Instructions:
- Spring onion as required
- Chopped tomatoes as required
- Onion as required
- Cheese as required
- Green Capsicum
- Fresh coriander
- You can add chicken or other lean meats, spinach, ricotta cheese, bacon, and lots more as per your taste.
- Eggs x 6 - beaten with 2 tbsp milk, salt and pepper to taste
Instructions:
- Preheat oven at 200°C
- Grease your mini muffin tin
- Add vegetables of your choice along with cheese (if you choose), pour beaten egg mixture on it.
- Place muffin pan on the center rack of a preheated oven and bake for 20-25 minutes or until muffins are light brown, puffy, and the eggs are set.
- Let muffins cool for a few minutes before removing from the muffin pan or cups. Loosen gently with knife if they seem to be sticking. Eat immediately or let cool completely and store in plastic bag in refrigerator or freezer. The Egg Muffins can be reheated in the microwave.
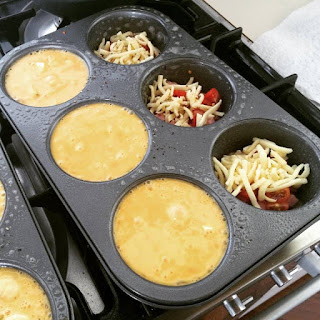
As you can see the recipe only asks for 6 eggs. That's not a lot of eggs. I was using muffin tins rather than mini muffin tins, so I got 6 mini quiches to a pan and I made 2 pans, 12 mini quiches. My muffin tins are individually quite large and it surprised me but each muffin well took 2 eggs. I started off the batch with only making up 6 eggs and quickly found that 6 eggs got me 3 mini quiches. I ended up using 24 eggs to make 12 mini quiches. I tell you this because you may have to adjust the number of eggs you use depending on the well size of your muffin tins.
Note: if you use mini muffin tins, your mini quiches will come out bite size.
For fillings, I got quite creative and frugal as well, rummaging through my fridge to see what I had. I ended up with quiches that had:
- Ham bits, tomato & feta (I was trying to use up some feta)
- Ham bits, tomato & cheddar (I ran out of feta)
- Mushrooms, green capsicum & feta
- Mushroom, tomato & feta (I ran out of green capsicum)
You can pretty much put in whatever filling you want.
I also used thickened cream rather than milk. The cream just gives it a slightly richer texture but milk is just fine too.
I gave the muffin tin a good spray of cooking oil before putting the ingredients in. Worked a treat. The mini muffins slipped right out. No muss, no fuss.
I gave the muffin tin a good spray of cooking oil before putting the ingredients in. Worked a treat. The mini muffins slipped right out. No muss, no fuss.
I'm delighted with the results. Already The Boy is saying he wants to have them for breakfast tomorrow rather than waiting till next week when he goes to work on Monday. We're heading to a wine and vineyard masterclass for the day and we've been told to bring full stomachs to soak up the alcohol we will be tasting. :-)
I hope you enjoy this recipe. It's super simple.
Let me know if you decide to make this. I'd love to see your results. Post a picture and tag me on Instagram or Twitter. :-)
Find Deanna around SOCIAL MEDIA:


