Wednesday, March 4, 2015

Blueberry cobbler and lemon cheesecake ... sometimes it's a bust!

I know I'm always posting about the yummy food I make and how delicious they turn out to be, but let's be frank here, not all food experiments turn out great. For me, more often than not, it is the baking or dessert dishes that turn out to be rather sad for me. I just don't do them well. I am working on it and trying more experiments and adding more to my repertoire but alas, some things are a bust!

Most recently, I had two things which I made that I was not entirely happy with. I don't think they will be keepers for me.

One of them was a cobbler. A friend of mine posted a lovely picture of a blackberry cobbler which she made with her grandson and it was a delightful family scene with the cobbler in front (looking delicious) and her grandson cute as can be in the background. He wanted "grandma time" and my lovely friend who is a wonderful baker decided they would bake together.


Her cobbler looks amazing. My cobbler looks like little blueberry turds.


I'm not too fussed about the way they looked, as I made them individually in ramekins whereas she made one huge one in a big glass bowl. The problem I had with my cobbler is that it was way too sweet. The recipe called for 1 full cup of sugar and I felt like I was literally just eating pure sugar with that much sugar in the dish. If I were to ever make this again, I will use half the sugar and see how I go with that. Of course, The Boy is also not a fan of cooked blueberries, so I don't know if I will be trying this again soon.


The other more recent disappointment was my lemon cheesecake. We were having company for dinner and I had the idea of a cheesecake for dessert. I searched the interwebs and found a lemon cheesecake recipe that I could make in the Thermomix which the poster claimed was wonderful and easy. However, at the end of the recipe, she put a disclaimer in which said:

Since I posted this recipe, some people have commented that their filling didn't set, although many others have said it worked fine.  I have no answers as to why this might have happened.  Perhaps the correct ingredients or quantities were not used?  Sometimes people substitute 'light' ingredients and expect the same result.  All I can say is I have been making this recipe of my Grandmother's since I was a teenager (over 30 years) and I have never had a problem with it. I hope it works for you.

This, of course, is not promising.

Anyway, turns out, I'm one of those people where the cheesecake didn't set properly for me. In fact, when I cut it, it just turned out to be this gooey mess with the filling spilling out of the sides. She said that I didn't use the correct ingredients or quantities, which is not true. I followed her instructions exactly and I did not substitute "light" ingredients. :-/

On top of that, what she failed to say was that this is only a half sized cheesecake, which I didn't really mind, but her recipe proportions were all wrong. The proportions she had down for the crust was not enough for the crust to reach 5cm up the side of the springform pan (my pan wasn't even that high or large) and I needed to use 1.5x portion of the crust ingredients just to get enough crust for my small 20cm springform pan.

The filling was also under proportioned, since I think I would have had to double the ingredients to get the filling to fill up my small pan. As it was, I only got half a pan of cheesecake filling and there was 2.5cm of crust sticking out the top of the cheesecake.

All that said, the filling and crust were both very tasty and it was a yummy cheesecake. It just didn't set properly and did not present well. Don't let my picture fool you, it looks really pretty in the crust but you can't tell that the filling didn't set from picture, can you? :-p

When I grumbled about the cheesecake recipe on Facebook, a foodie friend of mine made the comment that unfortunately a lot of recipes are posted untested. He and his wife are working with a chef to publish a cookbook right now and he says they test each recipe at least 3 times to make sure that they work before it goes to print. He also mentioned that Julia Childs never tested any of the recipes in her famous cookbook.

This just goes to show that there are so many variabilities when it comes to baking and desserts and these were certainly some of my #bakingfail moments. :-(

It also takes practice, I think, but there are only two of us in the house and practicing on baking and making desserts without many people to eat them would just mean my blood sugar levels will go through the roof. Not a good thing.

Anyway, that's it from me today. Just a little trip the lane where sometimes my food experiments go awry. Back to yummy (and tested) recipes time.

ps. I didn't post the recipes for the cobbler and lemon cheesecake because well, I don't feel good about posting recipes that didn't work for me and I can't say that it turned out great, but if you really want it, message me on Twitter or Facebook and I'll send it to you.


© This work is copyrighted to Invest-Ex and Destiny's Fortunes Pty Ltd

Find me around SOCIAL MEDIA:
Cooking blog: http://dazinthekitchen.blogspot.com.au/
Facebook: http://www.facebook.com/dazinthekitchen
Twitter: @langshipley https://twitter.com/langshipley
Instagram: @langshipley http://instagram.com/langshipley
Pinterest: https://pinterest.com/langshipley/
Youtube channel: http://www.youtube.com/user/langshipley
Makeup and beauty blog: http://langshipley-deannasworld.blogspot.com.au/


Wednesday, February 25, 2015

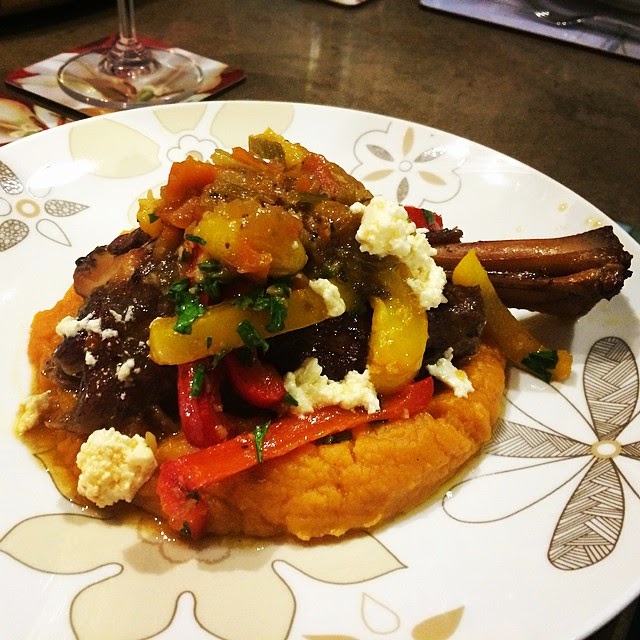
Braised lamb shank with sweet peppers and feta on a bed of sweet potato mash ... in the Thermomix


Since we've moved to wine country, we have some lovely neighbours. Not new neighbours, since we've known Gay and Warren for 10+ years from when my parents owned the house we're in now, till when we bought the house but never lived in it cos we had it rented out and now.

It has become a bit of a thing where we have Gay and Warren over to dinner (and you know how much I love cooking for company) perhaps once every 3 or 4 weeks. Since we've been up here for 5 months, I think they've been over to dinner as many times. I love the challenge of coming up with something new each time and hopefully not repeat myself too much.

This time when Gay and Warren came over for dinner, I decided on something slow cooked. Slow cooked because the meat was going to be very melt in your mouth tender and because I thought it would be better for Gay's 95 year old dad who was coming over to dinner too - you know, on account of he may not be able to chew something tough!

I picked out two recipes to try and decided to go with the lamb shanks as I had not cooked lamb in a while. The recipe came from The New Slow Cooker by Brigit Binns.

Here is the recipe:

Ingredients:
  • 4 - 6 lamb shanks, about 1lb (500g) each, trimmed of fat
  • Salt and freshly ground pepper
  • 3 tablespoons olive oil
  • 1 yellow onion, finely chopped
  • 1 large carrot, finely chopped
  • 1 stalk of celery, finely chopped
  • 3 bay leaves
  • 1 teaspoon dried oregano
  • 1/2 teaspoon ground cumin
  • 1/2 cup beef stock
  • 1/4 cup dry white wine
  • 1 yellow bell pepper, thinly sliced
  • 1 red bell pepper, thinly sliced
  • 2 cloves of garlic, minced
  • 3 tablespoons continental parsley, coarsely chopped
  • 1 cup crumbled feta

Instructions:
  • Season the lamb shanks generously all over with salt and pepper. In a large pan over medium high heat, warm 2 tablespoons of olive oil. When oil is hot, working in batches if necessary to avoid crowding, add the shanks and sear, turning as needed, until golden brown on all sides, about 8 minutes total. Transfer to plate.
  • Pour off most of the fat from the pan and return it to medium high heat. Add onion, carrot, celery, bay leaves, oregano and cumin, saute until vegetables are golden, 6 - 8 minutes. Pour in stock and wine and stir to dislodge any browned bits on the pan bottom. Transfer the contents of the pan to a slow cooker and stir in 1/2 teaspoon salt and several grinds of pepper. Place the lamb shanks on top. Cover and cook on low setting for 7 hours, basting once or twice with the braising liquid if possible. The meat should be very tender.
  • Carefully transfer the shanks to a platter. Cover to keep warm. Strain the braising liquid into a small saucepan, let stand for a few minutes, then skim away the fat with a large spoon. Bring to boil over high heat and boil until reduced by about half, about 5 minutes.
  • In a frying pan, over medium high heat, warm the remaining 1 tablespoon of olive oil. Add the bell peppers and saute until just beginning to soften, about 10 minutes. Add garlic and cook for 1 minute more. Remove from heat, stir in parsley and season with salt and pepper.
  • Divide the lamb shanks among warm individual plates and drizzle with the reduced braising liquid. Top each shank with a spoonful of the sauteed peppers. Sprinkle the feta over the top and serve immediately.

The recipe worked a complete treat.

One of the things that I have learned over the years of slow cooking is that the recipes never tell you to put in enough liquid. This one was no different. It asked for only a total of 3/4 cup of liquid. If something is going into the oven and cooking for 7 hours (the way I slow cook, with a dutch oven casserole pot in the oven at 120°C) the liquid is going to evaporate. I'd even hazard a guess and say that if you were using a crock pot, you'd still get a fair amount of evaporation after that long. I ended up adding 1 cup of white wine and 3 cups of beef stock into the pot. By the time we were done, the liquid had mostly evaporated but there was still enough left for sauce.

For the sweet potato mash, I used this recipe for mashed potatoes in the Thermomix, but substituted regular potatoes with sweet potatoes. It turned out beautifully.

If you want a non-Thermomix way to make mashed potatoes, here is a recipe that also makes absolutely delicious mash. Again, just substitute regular potatoes for sweet potatoes.

To serve, I spooned a serve of sweet potato mash onto the centre of my dinner plate, then placed the lamb shank on top of the mash. Then I placed some of the sweet peppers onto top of and around the lamb shank. After that, I scooped a spoon of the gravy along with the cooked down bits of carrot, celery and onion (I didn't strain it as the recipe said and it didn't need reducing since it had already reduced by about 75% over the 7 hour cooking process) on top of the lamb shank. To finish, I crumbled some feta cheese around the lamb shank.

As a side, I served some steamed broccolini with the dish so that we would have some greens to go with the meal.

This dish was full of flavor and the lamb shanks were incredibly tender. There was flavor bursting in our mouths with every bite.

If you do make this, be sure to post pictures for me to see either on Instagram - be sure to tag me with @langshipley or on my Daz In The Kitchen Facebook page.


© This work is copyrighted to Invest-Ex and Destiny's Fortunes Pty Ltd

Find me around SOCIAL MEDIA:
Cooking blog: http://dazinthekitchen.blogspot.com.au/
Facebook: http://www.facebook.com/dazinthekitchen
Twitter: @langshipley https://twitter.com/langshipley
Instagram: @langshipley http://instagram.com/langshipley
Pinterest: https://pinterest.com/langshipley/
Youtube channel: http://www.youtube.com/user/langshipley
Makeup and beauty blog: http://langshipley-deannasworld.blogspot.com.au/


Wednesday, February 18, 2015

Tangy tagliatelle with prawns, tomato, spinach and garlic


Since we've moved, we have been shopping at Aldi rather than our usual Coles because it is much more budget friendly and we can get about 90% of what we are looking for, for our cooking and grocery needs. Plus The Boy has retired now and we need to just watch our spending.

The thing I like about Aldi is that each week they have some kind of themed special and this week it was "gourmet" week. It was great fun as they had some lovely Italian finishing balsamic vinegars, whole truffles in jars, seasoned sea salt, and some great handmade Italian egg pasta noodles.

I picked up some rather fancy tomato and chili tagliatelle and decided to come up with a tasty dish of my own. I had this idea that I didn't want a "sauce" for the pasta per se, but rather, I wanted to dress it in some olive oil, garlic and lemon.

This is what I came up with:


Ingredients:
  • 250g tagliatelle pasta
  • 6 cloves garlic, minced
  • 250g grape tomatoes, halved
  • 60g baby spinach (half of a 120g bag)
  • 30 prawns (medium sized)
  • Juice of 1 lemon
  • 6 tablespoons olive oil
  • Salt

Instructions:
  • Put water to boil for pasta, add some olive oil and salt into the water. While the water is coming to a boil, prep all your ingredients. When water is boiling put in tagliatelle, cook for 6 - 7 minutes, until pasta is al dente.
  • While pasta is cooking, in a large wok or frying pan, put in some olive oil and the prawns. When the prawns are lightly cooked, add in the garlic and cook for about 1 minute (you do not want to brown the garlic, just cook it a little bit). This should be about 3 to 4 minutes into the pasta cooking at this point.
  • Then add in the tomatoes and cook for a minute or two. Add more olive oil, you need enough olive oil to coat all the pasta.
  • After tomatoes have cooked for a while, (the pasta should be ready now) add in spinach and stir around to cook the spinach. 
  • Add lemon juice and continue cooking.
  • Drain the pasta and put the cooked pasta into the frying pan. Stir the pasta around so that it is coated in all the olive oil and lemon juice and the flavor of the sauce. Taste and add salt, if necessary.
  • Serve and eat immediately.
  • Enjoy!

This recipe turned out super tasty. The lemon in the dressing just added a special tanginess to the flavor of the pasta that was sensational.

I even went so far to say that this dish is definitely fit for company and I will definitely make it again and even do it when we have company.

Now, I know I said that I used a tomato and chili (hence the redness of the pasta in the picture!) tagliatelle, but really, any tagliatelle will do, and if you prefer, even try it with linguine or fettuccine. I think both of those will be lovely with this dish as well.

If you do make this, be sure to post pictures for me to see either on Instagram - be sure to tag me with @langshipley or on my Daz In The Kitchen Facebook page.


© This work is copyrighted to Invest-Ex and Destiny's Fortunes Pty Ltd

Find me around SOCIAL MEDIA:
Cooking blog: http://dazinthekitchen.blogspot.com.au/
Facebook: http://www.facebook.com/dazinthekitchen
Twitter: @langshipley https://twitter.com/langshipley
Instagram: @langshipley http://instagram.com/langshipley
Pinterest: https://pinterest.com/langshipley/
Youtube channel: http://www.youtube.com/user/langshipley
Makeup and beauty blog: http://langshipley-deannasworld.blogspot.com.au/

Wednesday, February 11, 2015

Brandied strawberry tarts with fresh whipped cream ... in the Thermomix


Anyone who knows me and knows my cooking abilities will know that dessert is not my strong suit. I suck at baking and I always struggle with trying to figure out what to make and serve for dessert when we have company.

Recently, we had some friends coming over for dinner and after a while of thinking, I had managed to figure out starters and mains but dessert still eluded me. I even posted on Facebook asking my friends to offer suggestions (I got some good ones!).

Then I looked into the fridge and found that I had a lot of strawberries waiting to be eaten and I thought that I would do something simple like fresh strawberries and cream, but that just seems like such a cop out.

Next, I decided that I would marinate the strawberries to give it a little something interesting to just fresh strawberries. This quickly evolved into the idea of perhaps a strawberry tart.

I'd like to point out that I have never made this dish before at that point and was rather nervous about the whole thing, but decided to be adventurous. I was experimenting on dinner guests, which I generally don't like to do, but these friends were our neighbors and well, they've seen me in my pajamas so an experimental strawberry tart would not be too terrible.

Here's what I did to make the tarts:

Ingredients:

  • 500g strawberries halved
  • 1/2 cup of spirits, rum, brandy or any sort you like
  • 1/3 cup brown sugar
  • Juice of 1 lemon
  • 2 sheets of puff pastry, defrosted, halved
  • 1 egg
  • A dash of milk

Instructions:
  • Halve the strawberries and put them into a large bowl.
  • Pour in spirit, brown sugar and lemon juice. Mix thoroughly. Cover in cling wrap in put in fridge to marinate. After a few hours take out, stir, cover again and put back in fridge. Best if marinated overnight but if not, 4 to 6 hours is good.
  • When ready to cook, thaw out two sheets of puff pastry. 
  • Heat oven to 200°C.
  • Halve the puff pastry sheets and fold over the edges on all sides to make a 1cm rim. Make an egg wash with the egg and milk and paint over the rim of the pastry.
  • Place strawberries (without the liquid marinate) into the middle of puff pastry - divide equally between the 4 serves.
  • Put into oven and bake for about 25 minutes or until the sides are golden brown.
  • Serve with freshly whipped cream.

And of course, the cream was just quickly whipped up in my trusty Thermomix.

Ingredients:
  • 250 ml Whipping Cream
  • 40 grams Caster Sugar

Instructions:
  • Speed 3, 1 Minute 15 seconds, Butterfly  - Place the ingredients in the TM 31 bowl and mix per settings.

If you find the cream is not thick enough, just whip it for an extra 15 or 30 seconds, but be careful not to over-whip it or you will end up with butter.

I'm very pleased to say that the tarts turned out to be delicious. Served with the whipped cream, which got all melty from the hot tart, it was just divine. The Boy loved it and our guests asked for spoons so they could scoop up the melted cream that had mixed with the brandy mixture from the strawberries. Very tasty!

If you do make this, be sure to post pictures for me to see either on Instagram - be sure to tag me with @langshipley or on my Daz In The Kitchen Facebook page.


© This work is copyrighted to Invest-Ex and Destiny's Fortunes Pty Ltd

Find me around SOCIAL MEDIA:
Cooking blog: http://dazinthekitchen.blogspot.com.au/
Facebook: http://www.facebook.com/dazinthekitchen
Twitter: @langshipley https://twitter.com/langshipley
Instagram: @langshipley http://instagram.com/langshipley
Pinterest: https://pinterest.com/langshipley/
Youtube channel: http://www.youtube.com/user/langshipley
Makeup and beauty blog: http://langshipley-deannasworld.blogspot.com.au/

Thursday, February 5, 2015

How to sharpen a Wushtof panini knife / super slicer / scallop edged knife


I'm not sure if I have ever mentioned, but I love my knives. I'm a huge fan of having a really good knife for the purpose that it was designed to be used in order to maximize your cutting experience.

I have a rather large collection of knives, though I do not think it is excessive. A 6-piece set of Global knives, some Wushtoff knives, The Boy has his favorite 3-piece set of Henckel knives and most recently added to the collection some Ken Onion "Rain" knives.

Out of all the knives I have, the most specialized knife I own is my Wushtoff Panini knife. This is a scallop edged knife, sort of like a reverse serrated edged knife.


I bought this knife from Eversharp Knives in Minesotta when we visited the US about 3 years ago.

This knife is perfect for slicing slightly frozen meat, hard meats like salami and pepperoni, and even hard cheeses. It slices through those suckers like they were butter.

The problem though, that I have with this knife is that it is very hard to sharpen because of the scallop edge. In fact, I went three years without sharpening the knife and fortunately, the knife held it's edge and I was able to continue to use it quite effectively, even though I knew it needed to be sharpened.

We traveled to the US recently for a vacation to visit family and I completely forgot to take my knife with me to get it sharpened at Eversharp.


When we got to Eversharp, I mentioned sharpening the knife to Joe who is the knife sharpening guru there (he sharpens betweenn 150 and 300 knives a day!). Joe recommended a small, thin diamond sharpener to me and demonstrated how I could sharpen the knife myself.

I filmed a short video of the demo so that I would remember it.


I'm so glad that I have this video and the knife sharpener because it means I am now able to sharpen one of my favorite knives and I do love my knives sharp!

If you have a Wushtoff Panini Knife or any other type of scallop edged knife, like the Wushtoff Super Slicer (a long version of the Panini Knife). this is how you sharpen it yourself, if you can't find someone who knows how to sharpen them.

If you do do this, be sure to post pictures for me to see either on Instagram - be sure to tag me with @langshipley or on my Daz In The Kitchen Facebook page.


© This work is copyrighted to Invest-Ex and Destiny's Fortunes Pty Ltd

Find me around SOCIAL MEDIA:
Cooking blog: http://dazinthekitchen.blogspot.com.au/
Facebook: http://www.facebook.com/dazinthekitchen
Twitter: @langshipley https://twitter.com/langshipley
Instagram: @langshipley http://instagram.com/langshipley
Pinterest: https://pinterest.com/langshipley/
Deanna's World Youtube channel: http://www.youtube.com/user/langshipley
Deanna's World blog: http://deannasworld1.blogspot.com.au/

Thursday, January 29, 2015

Orange Roughy on a bed of pea and asparagus risotto ... in the Thermomix


I need to start off by saying that I am damned proud of this dish and how it turned out. It was absolutely delicious.

We've recently started having more fish as we've discovered a good fish supplier (almost) locally. It's an hour drive and back to get to them but we get excellent fresh fish and at great prices.

The Boy is always after me to make more fish to add to our diet, but I'm not a big fan of fish in general. I need my fish to be really, really fresh and not smell like fish. Can't stand that fishy smell!

Long story short, we went for a little trip and picked up some fish and Orange Roughy (a fish from New Zealand) was in the mix. The Boy loves Orange Roughy. I asked for two portions but didn't realise that for the Orange Roughy, one portion could feed two people. They came frozen (though I could have asked for them fresh, had I known!) and I just put them straight into the freezer.

The last few times that we have been out, The Boy has ordered fish and it has arrived on a bed of risotto of some sort. I thought that was a great way to serve fish, since we always find that fish on its own just isn't quite satisfying enough as a meal.

We had some friends over to dinner recently and I was at a loss as to what to cook for dinner and The Boy reminded me that we still had the Orange Roughy in the freezer, so I thought I'd serve the fish on a bed of risotto for the mains.

Here's what I did for the fish: (of course, it doesn't have to be Orange Roughy, you can use any fish you like).

Ingredients:
  • Orange roughy (or any other type of) fish in single serve portions, as many as needed for number of people serving
  • Salt
  • Pepper
  • Paprika 
  • Olive oil

Instructions:
  • Heat oven to 200°C
  • Prepare baking trays with a sheet of aluminum foil on it. Lightly spray with oil (I use an olive oil spray)
  • Place Orange Roughy onto the tray, depending on size of the tray, 2 or 4 to a tray
  • Drizzle a small amount of olive oil on top of fish
  • Sprinkle salt and pepper onto fish for taste
  • Dust a light coating of paprika onto fish as well
  • Bake in oven, uncovered for 8 - 10 minutes until fish is done
  • Serve on a bed of pea and asparagus risotto

For the risotto, originally I thought of making a porcini and truffle risotto but then thought that the porcini and truffle might overpower the flavor of the fish, so went with pea and asparagus instead.

Here's how I made the risotto: (of course, if you don't have a Thermomix, you can make your risotto the traditional way).

Ingredients:
  • 1 cup of Parmesan, block or shredded
  • 1 onion, quartered
  • 3 cloves of garlic
  • 40g Olive oil
  • 300g Arborio rice
  • 80g white wine
  • 4 tsp chicken stock
  • 1 litre of hot water
  • 1 cup peas
  • 1 bunch asparagus, diced

Instructions:
  • If Parmesan is in blocks, put in TM bowl, grind for 10 seconds, speed 7, remove and set aside
  • Chop onion and garlic together Speed 6, 3 – 5 seconds, scrape sides
  • Add olive oil and sauté at 100 degrees for 2 minutes
  • Add Arborio rice and wine wine, sauté for 2 minutes at Reverse speed 1, 100 degrees
  • Add stock and hot water, set time to 12 minutes, Reverse speed 1, 100 degrees
  • After 12 minutes, peas and asparagus, cook at 100 degrees for 4 minutes, Reverse speed 1
  • Remove risotto from TM bowl into a large serving bowl, fold in 2/3 of ground Parmesan, add pepper to taste.
  • Serve risotto and sprinkle remaining Parmesan on dish. Enjoy.

A word of advice, timing is everything for this dish. You don't want your fish to be done too early and go cold or get overcooked, so time your risotto and when it is about 8 to 10 minutes from being ready, then pop your fish into the oven.

To serve, I put a generous scoop of the risotto onto the middle of a dinner plate and then placed the fish on top of the risotto. For garnish, I kept it simple and just drizzled a little olive oil over the outer rim of the plate.

If you do make this, be sure to post pictures for me to see either on Instagram - be sure to tag me with @langshipley or on my Daz In The Kitchen Facebook page.


© This work is copyrighted to Invest-Ex and Destiny's Fortunes Pty Ltd

Find me around SOCIAL MEDIA:
Cooking blog: http://dazinthekitchen.blogspot.com.au/
Facebook: http://www.facebook.com/dazinthekitchen
Twitter: @langshipley https://twitter.com/langshipley
Instagram: @langshipley http://instagram.com/langshipley
Pinterest: https://pinterest.com/langshipley/
Youtube channel: http://www.youtube.com/user/langshipley
Makeup and beauty blog: http://langshipley-deannasworld.blogspot.com.au/

Monday, January 19, 2015

Herby potatoes baked with tomatoes, olives and feta


Firstly, I would like to apologise for the long time between posts. I have no excuse except that life is happening. I'll make an effort to be more regular but I am not making any promises.  Now onto the post ... I hope you like potatoes!

Right now, we have a lot of potatoes in stock. We went to the store for some potatoes about a week ago and instead of our usual 2kg bag which would last us a couple of weeks, we ended up getting a 4kg bag as they were out of the 2kg. That's double what we normally get and we're struggling to get through it.

Last night, I decided that we needed to make a potato dish (instead of just mash as a regular accompaniment to a meal) to use up some potatoes.

I remembered that at one point The Boy went a little potato crazy and thought he would be cooking up a lot of potatoes, so he picked up a few cookbooks on the topic. I went through our collection and found this little treasure and had a quick look through it.

I knew I wanted something with potatoes as the main ingredient, rather than as a side ingredient and found this recipe. It looked and sounded tasty (and let's face it, I liked the pretty picture in the book) and found I had most of the ingredients needs to make it.

Here's the recipe for the potatoes:

Ingredients:
  • 675g potatoes
  • 1 tablespoon butter
  • 3 tablespoons olive oil, plus extra for drizzling
  • 4 cloves of garlic, chopped
  • 2 red onions, quartered and sliced
  • 1 - 2 teaspooons cumin seeds
  • 1 - 2 teaspoons chili flakes
  • 2 teaspoons dried oregano
  • 2 teaspoons sugar
  • 1 tablespoon white wine vinegar
  • 400g can diced tomatoes
  • 12 - 16 black olives
  • 115g feta cheese, crumbled
  • salt and pepper to taste
  • lemon wedges to serve

Instructions:
  • Preheat oven to 200°C. Cook potatoes in a pot of boiling water for 15 - 20 minutes until just tender. Drain and refresh in cold water. Peel and cut the potatoes into thick slices or bite size wedges.
  • Heat butter and olive oil in a heavy pan, add garlic and onions and cook until soft. Add cumin seeds, chili flakes and most of the oregano, and then add sugar, vinegar and tomatoes. Season generously with salt and pepper.
  • Put the sliced potatoes and olives into a baking dish and spoon over tomato mixture. Crumble feta cheese generously over the top and sprinkle with remaining oregano. Generously drizzle with olive oil, then bake in oven for 25 - 30 minutes.
  • Serve hot, straight from the oven with lemon wedges to squeeze over the potatoes. Serve with a fresh green salad.

I didn't use any butter, but then, I seldom do. When a recipe calls for butter, I often use olive oil instead, which is what I did here.

Instead of boiling the potatoes whole to pre-cook them, I actually sliced them first, because I figured they would be easier to slice raw, rather than boiling hot and soft from cooking. I also didn't peel the potatoes as I find that leaving the skin (thoroughly washed!) on provides some structure to the potatoes and they are less likely to disintegrate.

This dish turned out super yummy and very hearty. It was fantastic as a main dish but I think it would work well as a side dish to a lovely beef or pork roast as well.

I did, however, forget to serve it with a wedge of lemon, but even without the lemon the potatoes were yummy!

If you do make this, be sure to post pictures for me to see either on Instagram - be sure to tag me with @langshipley or on my Daz In The Kitchen Facebook page.


© This work is copyrighted to Invest-Ex and Destiny's Fortunes Pty Ltd

Find me around SOCIAL MEDIA:
Cooking blog: http://dazinthekitchen.blogspot.com.au/
Facebook: http://www.facebook.com/dazinthekitchen
Twitter: @langshipley https://twitter.com/langshipley
Instagram: @langshipley http://instagram.com/langshipley
Pinterest: https://pinterest.com/langshipley/
Youtube channel: http://www.youtube.com/user/langshipley
Makeup and beauty blog: http://langshipley-deannasworld.blogspot.com.au/