Friday, October 10, 2014

Grand Marnier souffle ... in the Thermomix


I have recently decided that I need to spend more time working on and testing dessert recipes as desserts seem to be the most lacking component of my cooking repertoire. As a result, we did a little shopping trip to my favorite bargain book store and picked up a heap of dessert recipe books.

Even before the recipe books, I decided that I would like to try my hand at a souffle because I wanted to focus more on individual serve desserts rather than big pies and cakes (plus I suck at baking!).


I had a few souffle recipes in the books I got but randomly found a Youtube video of a really corny American guy (you have to watch the video to get what I mean!) making a Grand Marnier souffle to impress a girl on Valentine's Day. Of course, if you want to make the souffle the traditional method, by all means, just do what the guy did in his video (with his freakishly small spatula!). I have also included links below to the written recipes.


I decided to study the recipe and convert it for the Thermomix because (1) I could not find a Thermomix Grand Marnier souffle recipe and (2) The Boy really wanted a Grand Marnier souffle. He's been talking about it forever.

It took quite a while to convert the recipe from a regular recipe to a Thermomix recipe and I worked on it for a little over an hour, researching other souffle recipes to compare and to make sure that I got the timing and settings right. I have to admit, going into making the souffle that I was quite stressed and anxious as I did not know if it would turn out, or rise, or taste good. (The initial batter was not tasty at all!!)


Here's the recipe for what I did:

Ingredients: http://allrecipes.com/Recipe/Grand-Marnier-Souffle/Detail.aspx 
  • 1 tablespoon butter, melted
  • 1 tablespoon white sugar
  • 5 teaspoons butter, melted
  • 5 teaspoons all-purpose flour
  • 1/4 cup cold milk
  • 2 egg yolks (room temperature)
  • 1 teaspoon freshly grated orange zest
  • 1 tablespoon brandy-based orange liqueur (such as Grand Marnier®)
  • 1/8 teaspoon vanilla extract
  • 2 egg whites
  • 1/4 cup white sugar, divided

  • 2 large egg yolks (room temperature)
  • 1 cup heavy cream
  • 1/3 cup white sugar
  • 1 tablespoon brandy-based orange liqueur (such as Grand Marnier®)
  • 1/4 teaspoon vanilla extract

Instructions:
  • Butter and sugar ramekins and set aside on top of baking sheet.  Butter the ramekin and use a brush with strokes going straight up the sides. It encourages the rise to work properly.
  • Heat oven up to 180°C
  • Add butter, flour, milk, egg yolks, orange zest, grand marnier liquer and vanilla extract into Thermomix. Cook on  7min/90C/speed 4. VERY IMPORTANT: Check it at 5 minutes and make sure that is has not gotten too thick. Add more milk if necessary. You can't just let it run for the full 7 minutes without checking it, as your batter will probably end up too thick and dense, and not creamy enough! It needs to be a thick, creamy consistency. Transfer to a bowl and set aside to cool.
  • In a separate bowl, whisk egg whites and slowly add sugar until they form soft peaks. Insert the butterfly whisk and whisk the egg whites on speed 3 measuring cup OFF / 4 minutes. Add sugar slowly when it starts to foam. Continue whisking until soft peaks (the whites shouldn't be very firm).
  • Pour grand marnier mixture into a bowl when it is lukewarm, add 1/3 of the beaten egg whites and stir vigorously to loosen it. Then, add the remaining egg whites and fold them in gently in order to keep as much air in as possible.
  • Bake in the preheated oven until risen and browned, 16-20 minutes.
  • To serve, take out of oven, sprinkle with icing sugar. Then, make a hole in the middle of the souffle and pour in 3 tablespoons of the Creme Anglaise. Makes it very lush! Serve and eat immediately!!

Creme Anglaise (souffle filling):
  • Add everything into TM bowl. Cook 8 min/80C/speed 3.
  • Pour into a small gravy boat or a milk jug to serve.

This recipe makes 2 medium sized souffles. If you want to make more, just double or triple the recipe as required.

From start to finish, between prep and cooking time, this took between 45 - 60 minutes, so if you are planning on making this for dessert after a dinner party, be prepared for that. It could take a while between courses.

Also, I didn't slowly pour the sugar into the egg whites to slowly whisk to make soft peaks. I just dumped all the sugar in and whisked away. I did, however, stop and check while whisking and whisked a total of about 4 - 4.5 minutes. The meringue was quite soft (slighly liquidy but not runny) and very glossy in texture. I expect that if you didn't want to check it and just ran it for 4 minutes, you could be okay, but with meringues I like to be safe and check regularly. It's a fine line and a short time between just right and too much!

This was a two Thermomix bowl jobbie for me. I used the first bowl to make the batter. Then immediately switched to the second bowl to make the meringue. After that, I washed (okay, The Boy washed, not me!) the first bowl and set it aside to use to make the Creme Anglaise. If you do not have two Thermomix bowls, then you will have to quickly wash and dry between each step.

I got so darned excited when I checked (okay, stalked!) the oven to see if it had risen at all, and it had!!


I have to say, I am super happy with the way that this turned out. It was light, fluffy and delicious. Adding the Creme Anglaise in the middle made it super decadent. When you poke a hole in the souffle to pour in the Creme Anglaise, just bear in mind that your souffle will deflate somewhat because of you putting a hole in it.

The Boy was super pleased with the dessert (we had it for afternoon tea as I was recipe testing!) and even went so far to say that it was the best thing he had ever put in his mouth. :-) Of course, that compliment from him made me very happy!


If you do make this, be sure to post pictures for me to see either on Instagram - be sure to tag me with @langshipley or on my Daz In The Kitchen Facebook page.


© This work is copyrighted to Invest-Ex and Destiny's Fortunes Pty Ltd

Find me around SOCIAL MEDIA:
Cooking blog: http://dazinthekitchen.blogspot.com.au/
Facebook: http://www.facebook.com/dazinthekitchen
Twitter: @langshipley https://twitter.com/langshipley
Instagram: @langshipley http://instagram.com/langshipley
Pinterest: https://pinterest.com/langshipley/
Youtube channel: http://www.youtube.com/user/langshipley
Makeup and beauty blog: http://langshipley-deannasworld.blogspot.com.au/


Sunday, October 5, 2014

Pork dumplings with chili oil


I recently bought a cookbook called "Asian Wraps & Rolls" by Vicki Liley, which I've started using. The reason I bought this cookbook was also the reason for this post. These very yummy pork dumplings. I was browsing through the cookbook while at the store and when I saw the recipe for pork dumplings, it sealed the deal for me!

I have to say that I love dumplings. Well, both The Boy and I do and we've been buying ours from Chinese grocery stores frozen, which we would then steam for a snack or a light lunch.

However, I wanted to make them myself (so much more control as we don't live near any Chinese grocery stores now) and this recipe made it a great opportunity for me to do so.

Here's what I did:

Ingredients:
  • 150g ground minced pork
  • 150g jumbo shrimp / king prawns, shelled and deveined (I use frozen ones that have been defrosted)
  • 2 cloves of garlic, minced
  • 1 tablespoon peeled and freshly grated ginger
  • 1/4 teaspoon salt
  • 1 tablespoons freshly chopped cilantro (fresh coriander)
  • 1 tablespoon chopped fresh Vietnamese mint
  • 16 wonton skins

For chili oil:
  • 1 tablespoon chili oil
  • 1 teaspoons kechap manis
  • 1 tablespoon finely chopped garlic
  • 1 teaspoon Chinese red vinegar

Instructions:
  • In a good processor, combine pork, shrimp, garlic, ginger and salt. Process for 20 seconds, or until well blended. Transfer to a bowl and add cilantro and mint. Using wet hands, mix until well combined.
  • Place wonton skins on a work surface. Cover remaining skins with a clean damp cloth.
  • Place 1 tablespoon of pork filling in centre of wonton skin and brush edges of skin with water. Gather edges around filling, forming a basket. Gently squeeze centre of dumpling so that the filling is exposed at top. Tap base of dumpling on work surface to flatten. Set aside on a tray and cover with plastic wrap. Repeat with remaining wonton skins and filling.
  • Line a medium sized bamboo steamer with parchment (baking paper). Fill a medium sized wok about 1/3 full with water (steamer should not touch the water). Bring water to a boil. Arrange the dumplings in steamer. Cover with lid. Place steamer over boiling water. Steam for 12 minutes, adding more water to wok as necessary.
  • Meanwhile, stir all chili oil ingredients together in a small bowl. Lift steamer off work and carefully remove dumplings from steamer. Serve hot, with chili oil for dipping.

I doubled the recipe as I wanted to make a bit more so that I would have some leftovers for lunch the next day as I made these for an afternoon snack and also perhaps, if there was enough, to freeze for another day. Alas, between us eating them (The Boy had seconds) and me giving some of them away to my neighbour, we didn't have much left. There's enough for me to have a small serve for lunch tomorrow. I'll need to make more next time.

I did do a few things differently, just because I had some ingredients (in different forms) already in the fridge and I wanted to use them. I used the same measurements (just doubled) for the substitutes.

Instead of freshly chopped coriander and ginger, I used a coriander paste and a ginger paste from Gourmet Garden. They do some lovely herb pastes that are excellent quality and taste wonderful.

I also used minced garlic from a jar rather than fresh garlic, again because I had some in the fridge and I was wanting something quick and easy with minimal chopping to get the snack made quickly.

The grocery store did not have Vietnamese mint, so I just used plain old mint. It was a fine substitute.

I put everything except the mint into the food processor (I used my Thermomix!) and mixed it for 10 seconds instead of 20, just because my Thermomix mixes faster. If you are using a regular food processor, try the 20 seconds but keep an eye on your mixture. You don't want to over process it. Then, I hand mixed the mint through the meat mixture, just so that the mint was still in little pieces rather than processed to mush.


When steaming, make sure that you allow quite a bit of space between the dumplings as they do expand in size when they are cooked. I made the mistake of not allowing enough room as I wanted to steam them all in one batch and they got pretty stuck together. Fortunately, I was able to remove them without damaging the wrapper.

These turned out SUPER tasty. We usually put soy and chili sauce over our dumplings, but in reality these did not need them, in particular it did not need the chili sauce.

I hope you try these out. If you do make this, be sure to post pictures for me to see either on Instagram - be sure to tag me with @langshipley or on my Daz In The Kitchen Facebook page.


© This work is copyrighted to Invest-Ex and Destiny's Fortunes Pty Ltd

Find me around SOCIAL MEDIA:
Cooking blog: http://dazinthekitchen.blogspot.com.au/
Facebook: http://www.facebook.com/dazinthekitchen
Twitter: @langshipley https://twitter.com/langshipley
Instagram: @langshipley http://instagram.com/langshipley
Pinterest: https://pinterest.com/langshipley/
Youtube channel: http://www.youtube.com/user/langshipley
Makeup and beauty blog: http://langshipley-deannasworld.blogspot.com.au/


Friday, September 26, 2014

The all American sloppy joe


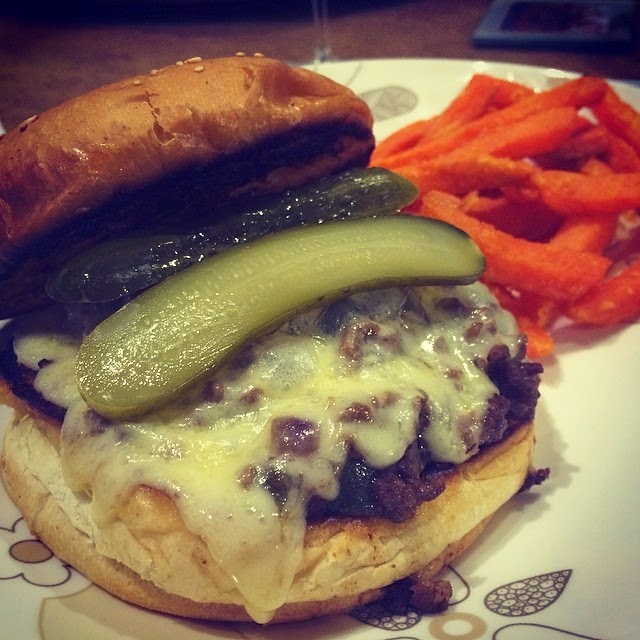
The Boy, as you know, will occasionally send me recipes he finds that he thinks are interesting, or that he would like us to try. Quite a while ago, he found a recipe on Facebook for a Philly cheese steak sloppy joe, which basically means, sloppy joe with a piece of cheese in it!

Recently, I decided to try my hand at making it and I followed the recipe. I found the recipe to be rather bland and then added some cayenne pepper to it to spice it up, but it turned out too spicy and not like your typical sloppy joe, or so The Boy said, as I have never had a sloppy joe before.

The next time I tried it, we were having some friends over and because (1) I didn't know if they could eat spicy food and (2) I wanted to make it a bit more authentic but still tasty, I varied the original recipe yet again and came up with something that was just delicious.

Here is what I did:

Ingredients:
  • 1 lb ground beef
  • 1 small sweet onion chopped
  • 1 green bell pepper seeded and chopped
  • 1/4 cup steak sauce (like A1 or Worchestershire)
  • 1 cup beef broth
  • 1 teaspoon paprika
  • 2 teaspoons garlic powder
  • 2 teaspoons beef stock powder
  • 2 teaspoons of corn flour mixed with a little bit of water
  • Provolone cheese
  • Sliced pickles / gherkins
  • Olive oil
  • Hamburger buns

Instructions:
  • Crumble the ground beef into a skillet and add the chopped onion and pepper. 
  • Begin to cook, when the beef is about half cooked, add the spices, broth and steak sauce. 
  • Cook until all items are done and allow to simmer. While simmering, add in corn flour mixture to thicken sauce and continue to cook down/thicken.
  • Heat a pan on the stove with some olive oil drizzled right around the pan
  • Slice open buns and place the flat side on to the pan and toast the bun till it is golden brown. It's okay if it gets a bit burnt! You may have to rotate the buns to get them toasted equally.
  • Heat your oven to 180°C.
  • Place buns toasted side up on top of a baking / cookie sheet lined with foil and fill them with the meat mixture. 
  • Top each one with a slice of provolone cheese.
  • Place in the oven or under the broiler / grill for 3 minutes to melt cheese.
  • Once cheese is melted, top with a few slices of the pickles / gherkin and serve.

The extra 2 teaspoons of beef stock powder really adds a robustness and depth to the flavor of the sloppy joe, as does the other spices, so don't skip those. Oh, and don't forget to serve with the pickles or gherkin slices as they really do add a lovely counterpoint to the rich beefy flavors.

This turned out to be super tasty and since I made a double batch, I ended up with leftovers which was super easy for me to heat back up in a pan and cook up for another meal.

Of course, they were also a success with our very Aussie friends, who had never tried such an American dish before.

If you do make this, be sure to post pictures for me to see either on Instagram - be sure to tag me with @langshipley or on my Daz In The Kitchen Facebook page.


© This work is copyrighted to Invest-Ex and Destiny's Fortunes Pty Ltd

Find me around SOCIAL MEDIA:
Cooking blog: http://dazinthekitchen.blogspot.com.au/
Facebook: http://www.facebook.com/dazinthekitchen
Twitter: @langshipley https://twitter.com/langshipley
Instagram: @langshipley http://instagram.com/langshipley
Pinterest: https://pinterest.com/langshipley/
Youtube channel: http://www.youtube.com/user/langshipley
Makeup and beauty blog: http://langshipley-deannasworld.blogspot.com.au/

Sunday, September 14, 2014

Steak and fries


For a very long time (2 - 3 years, I think), I was not eating any red meat and certainly not able to handle an entire steak. As a result, my poor darling didn't get any red meat at home (unless it was minced in a spaghetti sauce) and the only time he got a steak was when he went out to a steak house.

Recently, I've been back into the red meats again, slowly but surely. The whole process has taken a good year, but I'm back to eating it again and even craving it slightly.

Last night, The Boy decided that he wanted something simple, steak and fries and that is what he got. It's such a simple meal and so tasty.

Here's what I did:

Ingredients:
  • 2 x scotch fillet steaks
  • Garlic salt
  • Freshly ground pepper
  • Green leafy lettuce
  • Sweet potato fries (frozen from the store - any type you like)

Instructions:
  • Defrost your steaks if they are frozen
  • Place onto a plate and drizzle lightly with olive oil, sprinkle with garlic salt and ground pepper
  • Heat up a pan to medium heat and place the seasoned side onto the pan
  • Cook for about 3 - 4 minutes. While the steak is cooking drizzle a little olive oil onto the top side of the steak and then season again with garlic salt and pepper
  • After the 3 - 4 minute mark, turn the steak over and cook again for another 3 - 4 minutes
  • Note: this will give you a medium-rare steak. If you want a more cooked steak, leave it in the pan for a longer period of time. If you want a more accurate check of your meat, you can also use a meat thermometer, and you can find the correct temperatures here.

For the sweet potato fries:
  • Heat up a small saucepan of canola, sunflower or whatever vegetable oil you like that can be used for frying and has a high heat point
  • Take the fries out of the freezer, and while the fries are still frozen, drop them in batches (how much will depend on the size of the saucepan you are using) into the saucepan and fry until a golden brown, about 2 - 4 minutes for each batch, depending on your oil temperature
  • Remove the fries and drain them in a plate lined with paper towels
  • Repeat until all the fries are cooked
  • Once all the fries are cooked, remove the paper towel, sprinkle some garlic salt over the fries and toss them to evenly distribute the garlic salt. This will make your sweet potato fries very tasty
  • Note: if the oil is hot enough, it will bubble when you drop the fries in. You can do one test fry to check the oil temperature. Also I used sweet potato because I like sweet potato fries, but really, you can use any type of fries you like

For the green leafy lettuce salad:
  • I just used some salad mix from the store and then dressed with with a little olive oil and balsamic vinegar. Very simple

This dinner turned out to be super tasty and The Boy really enjoyed it a great deal. This is also probably the first time in several years that I have cooked a steak for us for dinner. I think I will be doing it again soon. I really enjoyed it.

If you do make this, be sure to post pictures for me to see either on Instagram or on my Daz In The Kitchen Facebook page.


© This work is copyrighted to Invest-Ex and Destiny's Fortunes Pty Ltd

Find me around SOCIAL MEDIA:
Cooking blog: http://dazinthekitchen.blogspot.com.au/
Facebook: http://www.facebook.com/dazinthekitchen
Twitter: @langshipley https://twitter.com/langshipley
Instagram: @langshipley http://instagram.com/langshipley
Pinterest: https://pinterest.com/langshipley/
Youtube channel: http://www.youtube.com/user/langshipley
Makeup and beauty blog: http://langshipley-deannasworld.blogspot.com.au/


Monday, August 18, 2014

Yummy lemon butter ... in the Thermomix


I have always loved lemon butter and back in the day when I did not know how to cook, I used to ask my dear friend Evie to make me her lemon butter, which was always delicious.

Recently, we came into some lemons, as the lemons were in abundance in the lemon grove on the estate where we live in.


We got a bucket load of lemons and I decided to try my hand at making lemon butter, plus the Thermomix makes it so easy.

Here is the recipe that I used for the lemon butter:

Ingredients:
  • Juice 1 large lemon / 2 limes
  • 110g caster sugar
  • 80g unsalted butter
  • 2 eggs

Instructions:
  • Insert butterfly into TM bowl and add all ingredients.
  • Cook for 8 minutes / 80°C / speed 3.
  • Check to see if mixture coats back of spoon, if not cook for another 2-3 minutes or until desired consistency is achieved.
  • Place in sterilised jars and chill until thickened.
  • Use as filling to make tarts or simply serve as an accompaniment to other sweets.

This lemon butter was super yummy and when it was fresh out of the Thermomix and still warm, I just wanted to eat it by the spoonful.


We had them for morning tea with some scones on the day that I made it, as we had some people come to visit and they enjoyed it to.

This is definitely something that I will be making again.

If you do make this, be sure to post pictures for me to see either on Instagram or on my Daz In The Kitchen Facebook page.


© This work is copyrighted to Invest-Ex and Destiny's Fortunes Pty Ltd

Find me around SOCIAL MEDIA:
Cooking blog: http://dazinthekitchen.blogspot.com.au/
Facebook: http://www.facebook.com/dazinthekitchen
Twitter: @langshipley https://twitter.com/langshipley
Instagram: @langshipley http://instagram.com/langshipley
Pinterest: https://pinterest.com/langshipley/
Youtube channel: http://www.youtube.com/user/langshipley
Makeup and beauty blog: http://langshipley-deannasworld.blogspot.com.au/


Sunday, August 10, 2014

Homemade strawberry jam ... in the Thermomix


As you may have seen in a previous post, I made butter and buttermilk scones in the Thermomix and that became part of a completely homemade Devonshire Tea.

Of course, with any Devonshire Tea, one needs strawberry jam and so I used the Thermomix to whip up some of that.

It has become a bit of a ritual for us but when we decide we want Devonshire Tea, I will make up scones, jam and whipped cream in the Thermomix. It's all so quick and easy, so if you have a Thermomix, this is something that is easy to whip up, fresh and perfect for company.


The thing I love about making up some jam in the Thermomix is that it makes up a small enough serve that I have jam for a few serves and then I'm done. The next time I need more jam, 20 minutes in the Thermomix and viola! more fresh jam!! It's so simple.

I remember when we lived in the mountains and had an orchard. We would have so much fruit that we would not know what to do with it. I tried making my own jam and would end up with jars and jars and jars of it that I would not be able to finish. Then, we made some friends who would sell jam in the local markets and offered our fruit to them in exchange for some jars of jam they made, but even then, we would end up with jars and jars.

The Thermomix way is perfect. A single serve of jam every time.

I have to say that I have grown to quite love fresh, homemade strawberry jam. The taste is divine.

This is a very simple recipe that I found on one of the Thermomix recipe communities, though I don't recall exactly which one. It's so amazingly simple and yet delicious.

Here's the RECIPE for the jam:

Ingredients:

  • 1 package strawberries (250g punnet)
  • 1 granny smith apple, quartered and peeled
  • 120 grams sugar
  • 1 teaspoon Vanilla Bean Paste (or Extract)

Instructions:

  • Add to thermomix bowl all ingredients.
  • Cook for around 20 min/varoma/speed 1 (longer if you want thicker)- yummo!
  • Blend for around 30 seconds / speed 4 if you want it smooth – quick, easy, DELICIOUS! Store in a sterilised glass jar in the fridge and with this quantity of sugar, will keep well for 1 month+ (if it lasts that long!)
* Makes 1 small jar


This jam, of course, is a total hit with The Boy. He has enjoyed slathering gobs and gobs of it onto the scones that I've made to go with it for a lovely Devonshire Tea. I have even made a (very amateur) video on it, which I will link below.


If you decide to make this, with or without the Thermomix (though I don't know how without - probably plenty of standing and stirring!), do let me know. Be sure to post pictures for me to see either on Instagram or on my Daz In The Kitchen Facebook page.


© This work is copyrighted to Invest-Ex and Destiny's Fortunes Pty Ltd

Find me around SOCIAL MEDIA:
Cooking blog: http://dazinthekitchen.blogspot.com.au/
Facebook: http://www.facebook.com/dazinthekitchen
Twitter: @langshipley https://twitter.com/langshipley
Instagram: @langshipley http://instagram.com/langshipley
Pinterest: https://pinterest.com/langshipley/
Youtube channel: http://www.youtube.com/user/langshipley
Makeup and beauty blog: http://langshipley-deannasworld.blogspot.com.au/


Thursday, July 31, 2014

Making butter and buttermilk scones ... all done in the Thermomix!!


The Thermomix is indeed a rather marvelous machine and the more I use it, the more I love it. There just doesn't seem to be much it can't do ... okay, it can't bake and it can't slow cook, but short of that ... it can do most things.

One weekend, a little while ago, I got very ambitious and adventurous. I decided that I wanted to make my own butter and also then use the buttermilk resulting from that to make buttermilk scones ... why waste? It was an ambitious day, because I also made my own jam and whipped cream in the Thermomix but that's for another post on another day.

I looked around the interwebz for recipes for butter and found this marvelous YouTube video with instructions on how to make butter. I watched the video several times to get a good grasp of it, as I was rather nervous about the whole butter making thing, and also found a written recipe that I was able to print out and follow.  I can't remember precisely where I found the original recipe as I do not have it written down (I'm sorry!!) but here it is anyway.

RECIPE for butter:

Ingredients:
  • 600g pure cream (not thickened cream!!)

Instructions:
  • Insert the butterfly and measure in the cream:
    • 600g pure cream (make sure it's pure cream - thickened cream may not work)
  • Whip on speed 4 until it separates into butter and buttermilk. It will start to bump around, so stay near your machine and turn it off after a couple of seconds of 'bumping'. It usually takes only a minute or two, but I have had older cream take up to 5 minutes.
  • Strain the buttermilk by pouring it through the strainer/rice basket into a bowl. Squeeze the butter well with the spatula (against the side of the bowl) to get out as much of the buttermilk as you can. The buttermilk is lovely to bake with in scones, breads, cakes and pancakes (if you can have dairy), so don't throw it out!
  • Remove the butterfly from the bowl and pour about 500g icy cold water over the butter. Mix it on speed 4 for a few seconds to rinse it. Strain the water off into the sink, pressing the butter against the side of the bowl with the spatula and pouring through the strainer/rice basket again. The butter needs to be rinsed twice, or until the water is clear. If you leave any buttermilk in the butter, it will turn sour more quickly.
  • Give the butter a good squeeze to get rid of any remaining water. This can be done with the spatula, squeezing the butter against the side of the bowl; or you can wrap a piece of muslin around the butter and squeeze it; or you can just use your hands.
  • Now make sure the bowl is empty, and weigh the butter back in so you know how much you have. Then add in that much oil and water.
    • Eg: If you end up with 300g of butter, add 300g of oil and 300g of water. Also add a little salt if you like. I add a bit less than a teaspoon of salt to this amount of butter, oil and water.
      • macadamia oil (or olive oil if you like the taste)
      • filtered water
      • sea salt/himalayan salt (opt.)
  • Insert the butterfly, and whip the butter, oil, water and salt on speed 4 for about 20 seconds, or until well combined. Pour into a container and keep in the fridge.

(You do pour it into the container as it is quite a thick liquidy consistency when done, but it does set once it's been in the fridge.)

The butter turned out very well and very smooth. As you can see from the picture, it made two decent sized containers of butter. The butter lasted me about a month in the fridge. Do be careful with the butter and use it up quickly if you can, since it has no preservatives in it, it doesn't last as long as store bought butter.

I didn't put enough salt into the butter, so it was a bit bland. I was being very conservative as I was worried that I would over salt, but I didn't. So just be sure that you check the taste with the amount of salt you add in! You might need to adjust it somewhat.

Also, the macadamia nut oil is very mild, so it doesn't have much flavor at all. If you wanted something a bit more robust in flavor, try olive oil instead.

Next time, I plan on making some garlic and herb butter.


After making the butter, there was a fair bit of buttermilk leftover that resulted from making the butter. Instead of pouring it away, I dug up a recipe for making buttermilk scones and planned for us to have a Devonshire Tea. There was exactly the right amount of buttermilk from the butter for this scone recipe ... lucky me!


Here is the RECIPE that I used for the scones:


Ingredients:
  • 300 grams Self Raising Flour
  • 20 grams raw sugar
  • 1 pinch salt
  • 60 grams Butter, Chilled and cut in cubes
  • 200 grams buttermilk

Instructions:
  • Preheat oven to 200 degrees (fanforced). Line a baking tray with baking paper.
  • Place self raising flour, sugar, salt and butter in to TM bowl. 10 seconds/speed 6 or until it resembles breadcrumbs. 
  • Add buttermilk into mixing bowl -1 minute/knead setting or until dough comes together. Lightly flour the bench top and empty the dough out. 
  •  Work the dough until it comes together and roll out to about 3cm thick. Use a glass or round cookie cutter to cut out circles around 4cm and place on prepared trays, touching each other. Repeating this until all dough has been used up.
  • Lightly brush some milk onto top of scones.
  • Bake for approx 12 minutes or until golden brown. (more like 20 minutes)
Makes 7 regular sized scones

The scones were very easy to make and tasted wonderful. I am definitely doing this again, but if I don't have buttermilk from recently made butter, I will just buy the buttermilk.


If you do make these, be sure to post pictures for me to see either on Instagram or on my Daz In The Kitchen Facebook page.

I would love to hear from you!!


© This work is copyrighted to Invest-Ex and Destiny's Fortunes Pty Ltd

Find me around SOCIAL MEDIA:
Cooking blog: http://dazinthekitchen.blogspot.com.au/
Facebook: http://www.facebook.com/dazinthekitchen
Twitter: @langshipley https://twitter.com/langshipley
Instagram: @langshipley http://instagram.com/langshipley
Pinterest: https://pinterest.com/langshipley/
Youtube channel: http://www.youtube.com/user/langshipley
Makeup and beauty blog: http://langshipley-deannasworld.blogspot.com.au/