
Showing posts with label afternoon snack. Show all posts

Saturday, January 4, 2025

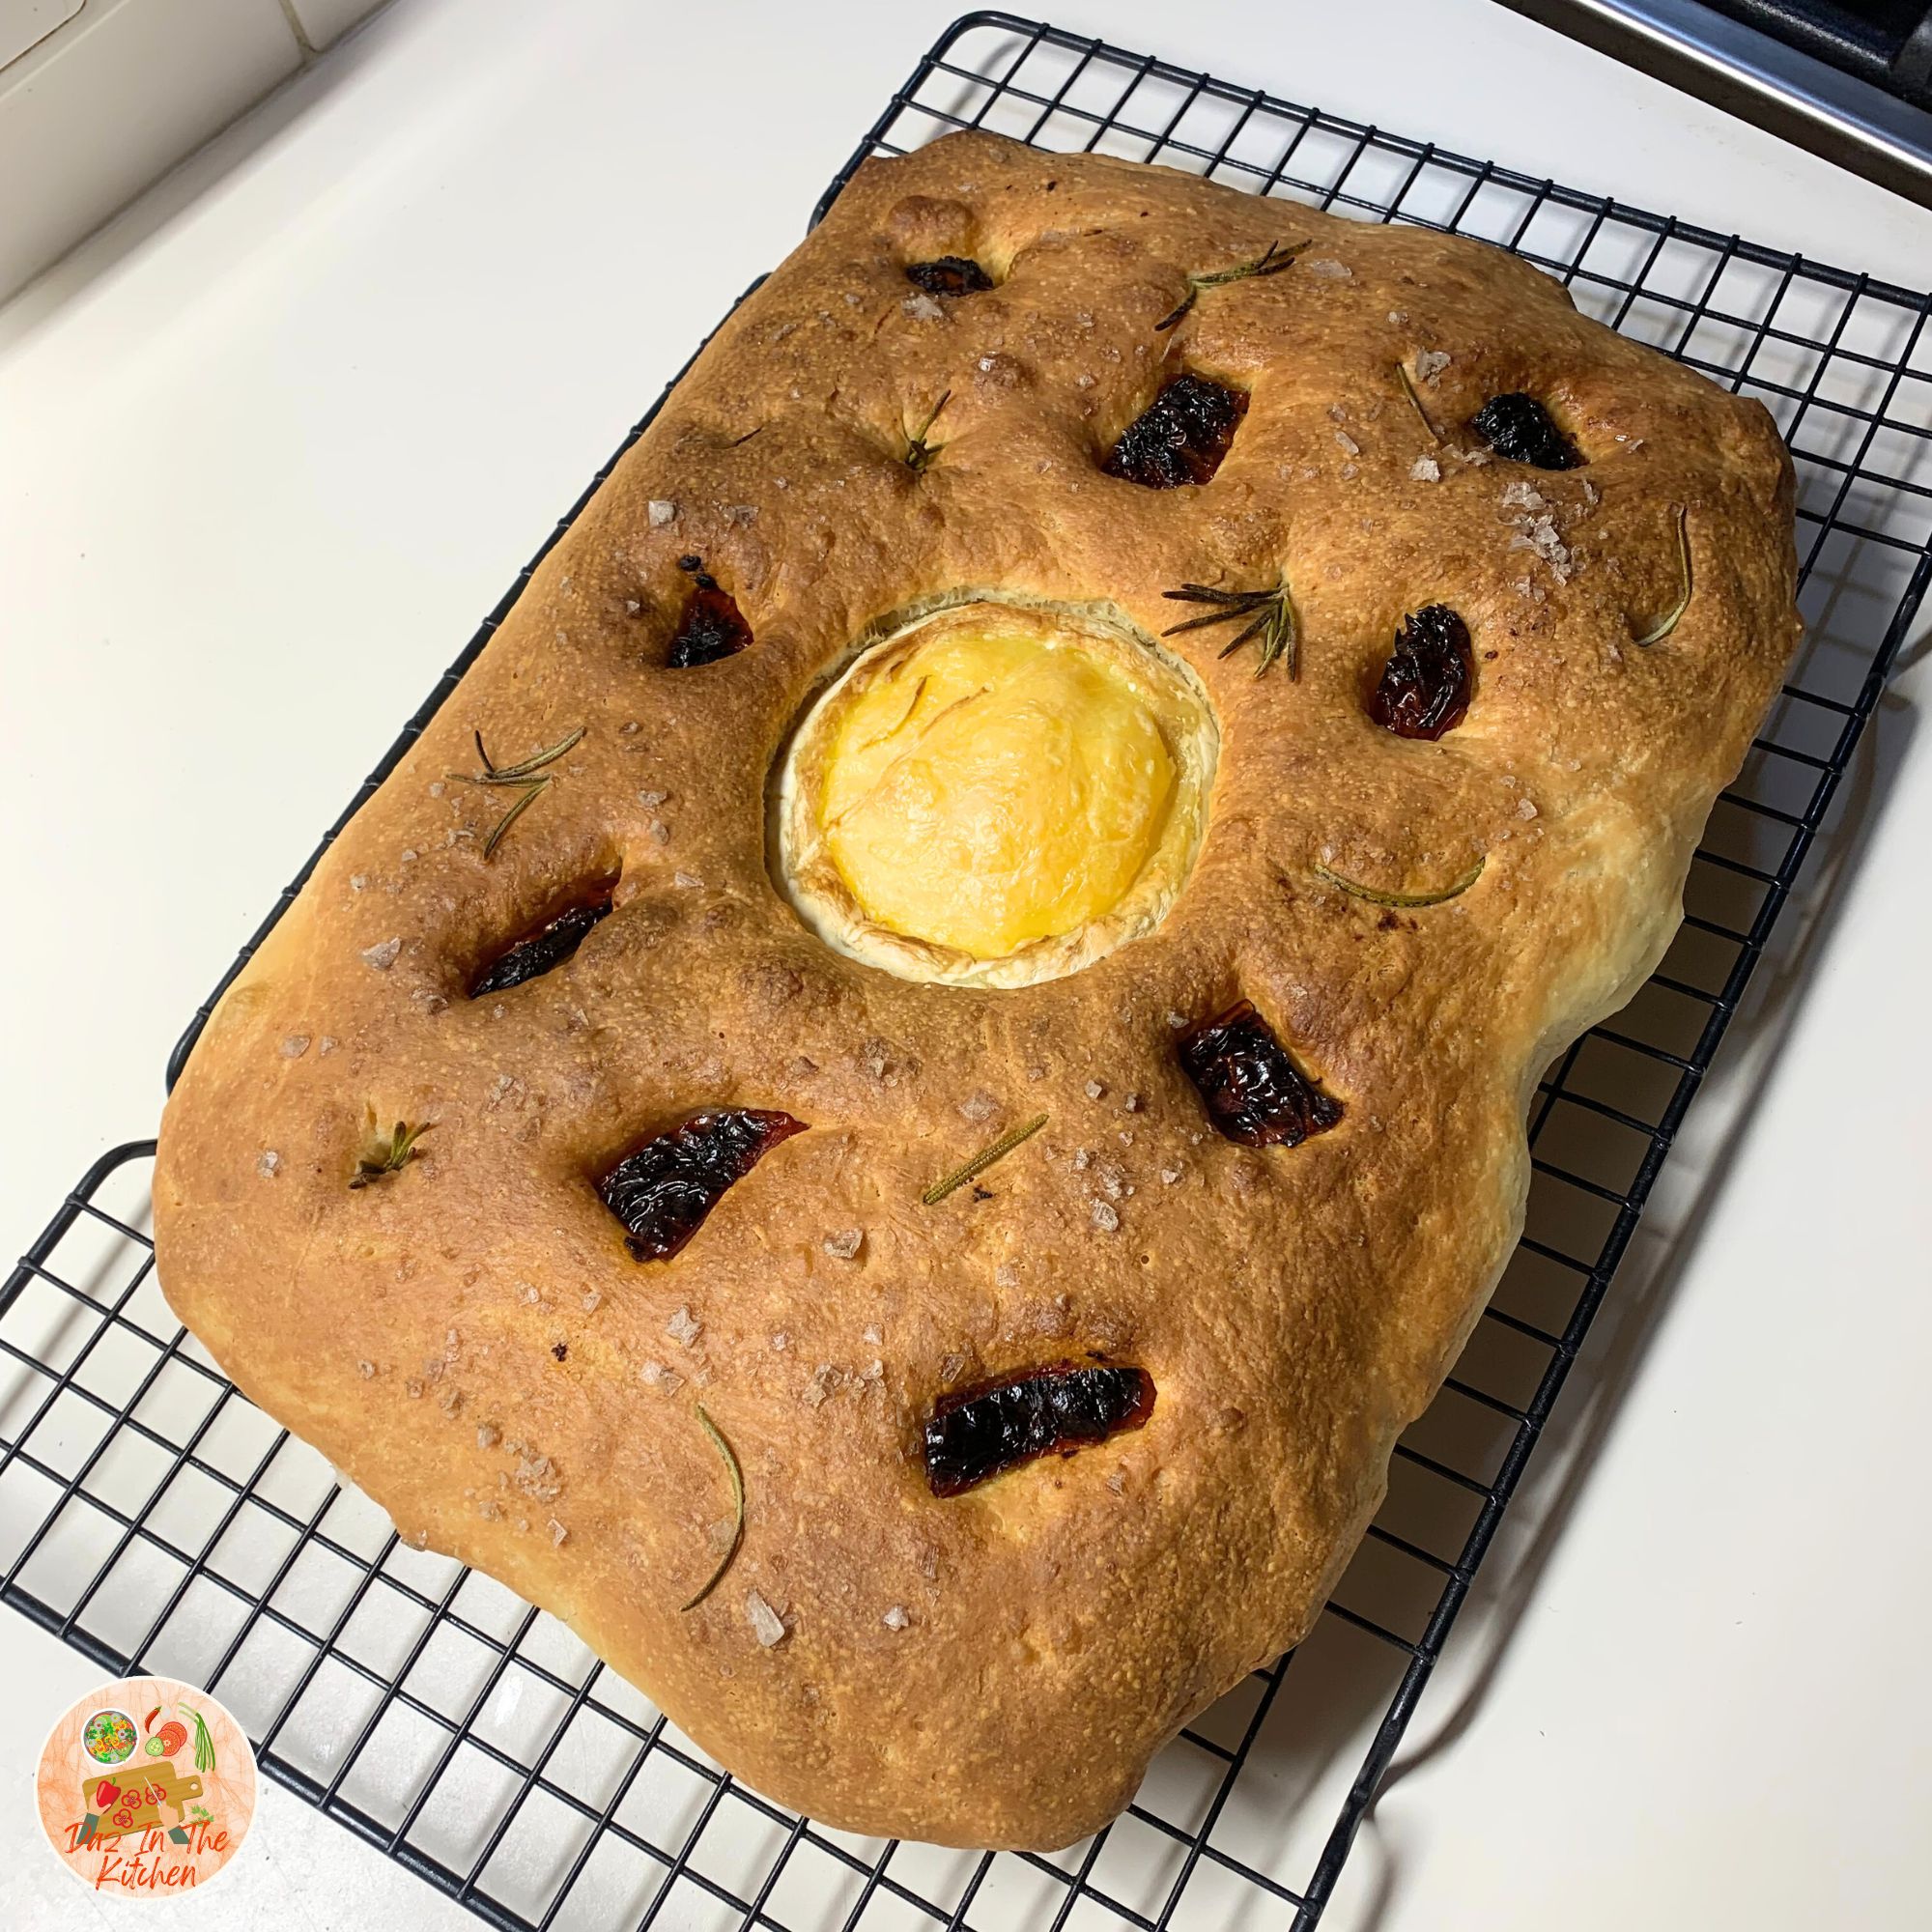
Focaccia charcuterie board with baked Brie

Focaccia with baked Brie Focaccia charcuterie board with baked Brie

I was influenced by social media for this recipe. I saw a quick video suggesting that I use focaccia as the board for a charcuterie board and then piling the charcuterie ingredients on top. Then tear and eat. The focaccia was amazing.

Wednesday, March 18, 2015

Garlic, chive and dill cream cheese ... in the Thermomix


We were given some lovely smoked salmon recently and were trying to decide how to eat it. Our usual is the Feta, avocado and tomato salad with some smoked salmon on the side, but we decided not to have that as a meal right then. The Boy suggested salmon bagels and we love cream cheese on our bagels.

Small confession time: I actually never like the flavored cream cheese that we get at the store as I always feel that the flavors are rather insipid and just not quite there, so I decided to make my own flavored cream cheese. I find plain cream cheese rather bland. I just came up with this little concoction myself and all the fresh herbs are from my garden.

Here's the RECIPE for what I did:

Ingredients:
  • 250g cream cheese (any brand you like)
  • 3 cloves of garlic, finely minced
  • 1 tablespoon fresh chives, chopped
  • 1 tablespoon fresh dill, finely chopped
  • Pinch of salt

Instructions:
  • Put all the ingredients into the Thermomix (or a food processor if you do not have a Thermomix - then blend until well mixed)
  • Set the Thermomix on reverse, speed 6 for 5 seconds
  • Check to see that all ingredients are well blended, if not, another 2 seconds on speed 6
  • Scrape the cream cheese mixture out of the Thermomix and put it back into the jar that the cream cheese came in, if it had a jar, if not, put it into an air tight container with a lid
  • Refrigerate and eat when ready, or if you like, eat immediately
  • Enjoy!

This is super delish and the flavor really packs a punch, especially with all the fresh ingredients. The 3 cloves of garlic really gives the cream cheese a good kick and if you don't like as much garlic, just use less. We like garlic, so I thought 3 cloves would be just lovely, but with 3 cloves you can really taste the garlic.

If you do make this, be sure to post pictures for me to see either on Instagram - be sure to tag me with @langshipley or on my Daz In The Kitchen Facebook page.


© This work is copyrighted to Invest-Ex and Destiny's Fortunes Pty Ltd

Find me around SOCIAL MEDIA:
Cooking blog: http://dazinthekitchen.blogspot.com.au/
Facebook: http://www.facebook.com/dazinthekitchen
Twitter: @langshipley https://twitter.com/langshipley
Instagram: @langshipley http://instagram.com/langshipley
Pinterest: https://pinterest.com/langshipley/
Youtube channel: http://www.youtube.com/user/langshipley
Makeup and beauty blog: http://langshipley-deannasworld.blogspot.com.au/

Saturday, December 6, 2014

Chicken liver pate ... in the Thermomix


I am a huge fan of pate but don't eat it that often as I do not like the store bought stuff. I recently went to one of my favorite restaurants and they changed their menu to include a pate on it. Of course, I had to try it and instantly got addicted and just wanted more.

Being new to the town that we are living in now, I didn't know where I could find liver of any sort, so I asked around on Facebook and a chef friend of mine suggested a butcher, while others suggested a hatchery. Turns out the local hatchery does not sell to the public, but I can order the livers in (any type - chicken, duck or goose) from the butcher and it takes a day to deliver, which is pretty good. I just need to plan ahead a little bit.

So, I ordered some chicken liver for the pate and enquired about goose and duck. Goose is available but takes longer to deliver, also much more expensive. Both chicken and duck are readily available.

I could not order in small quantities and the minimum order was 2kg, so I have quite a bit of chicken liver! :-) Enough to make up 4 batches.

I also love the fact that I can find almost anything for the Thermomix and found this recipe for the pate in the Thermomix.

Here's how I made it:

Ingredients:
  • 500 grams chicken livers
  • 125 grams Butter
  • 250 grams bacon
  • 1 onion
  • 60 grams any spirit, eg vodka, scotch, rum
  • 1 dash Garlic powder
  • 1/4 teaspoon nutmeg
  • pinch salt
  • 2 tablespoons cream

Seal:
  • 250g of butter melted in the microwave to clarify

Instructions:
  • Place quartered onion and bacon into TM jug and turbo pulse to dice up.
  • Add washed and deveined livers and all other ingredients except cream.
  • Cook for 15 minutes at 100 degrees reverse speed 1.
  • Add cream and blitz 10 seconds speed 7.
  • pour into various bowls/containers.
  • Can be frozen

Seal:

  • Spoon the clarified butter on top of pate to completely cover it to form a seal. This will help the pate keep longer. Be careful not to spoon any of the milk solids into the pate or you will get a cloudy seal.

I did follow the recipe fairly closely but was not sure what they meant by "dash" of garlic powder, so I used 1/4 teaspoon of garlic powder and also 1/4 teaspoon of salt, though I do know what a pinch of salt is. (The 1/4 teaspoon of salt was not too much. You can hardly taste it.)

I also wanted my pate to be smoother, so I did an additional blitz of 10 seconds on speed 8. I think I should have blitzed it a bit more, as I would have liked it even smoother than it turned out.

The pate came out of the Thermomix very hot and needed to be cooled before serving. I put the pate into 5 medium sized ramekins and filled it to the line on the ramekin then sealed it with the clarified butter.

After that, I popped the pate into the fridge to set. This took about 3 - 4 hours.

I am really pleased with how the pate turned out. It was delicious, and it also smelled and tasted like pate. The Boy who is not a fan of pate, really enjoyed it too. We had a lovely afternoon tea of pate on toast points, accompanied with champagne. Very lush indeed!.

I think I am going to try this same recipe with duck livers at some point.

If you do make this, be sure to post pictures for me to see either on Instagram - be sure to tag me with @langshipley or on my Daz In The Kitchen Facebook page.


© This work is copyrighted to Invest-Ex and Destiny's Fortunes Pty Ltd

Find me around SOCIAL MEDIA:
Cooking blog: http://dazinthekitchen.blogspot.com.au/
Facebook: http://www.facebook.com/dazinthekitchen
Twitter: @langshipley https://twitter.com/langshipley
Instagram: @langshipley http://instagram.com/langshipley
Pinterest: https://pinterest.com/langshipley/
Youtube channel: http://www.youtube.com/user/langshipley
Makeup and beauty blog: http://langshipley-deannasworld.blogspot.com.au/


Sunday, August 10, 2014

Homemade strawberry jam ... in the Thermomix


As you may have seen in a previous post, I made butter and buttermilk scones in the Thermomix and that became part of a completely homemade Devonshire Tea.

Of course, with any Devonshire Tea, one needs strawberry jam and so I used the Thermomix to whip up some of that.

It has become a bit of a ritual for us but when we decide we want Devonshire Tea, I will make up scones, jam and whipped cream in the Thermomix. It's all so quick and easy, so if you have a Thermomix, this is something that is easy to whip up, fresh and perfect for company.


The thing I love about making up some jam in the Thermomix is that it makes up a small enough serve that I have jam for a few serves and then I'm done. The next time I need more jam, 20 minutes in the Thermomix and viola! more fresh jam!! It's so simple.

I remember when we lived in the mountains and had an orchard. We would have so much fruit that we would not know what to do with it. I tried making my own jam and would end up with jars and jars and jars of it that I would not be able to finish. Then, we made some friends who would sell jam in the local markets and offered our fruit to them in exchange for some jars of jam they made, but even then, we would end up with jars and jars.

The Thermomix way is perfect. A single serve of jam every time.

I have to say that I have grown to quite love fresh, homemade strawberry jam. The taste is divine.

This is a very simple recipe that I found on one of the Thermomix recipe communities, though I don't recall exactly which one. It's so amazingly simple and yet delicious.

Here's the RECIPE for the jam:

Ingredients:

  • 1 package strawberries (250g punnet)
  • 1 granny smith apple, quartered and peeled
  • 120 grams sugar
  • 1 teaspoon Vanilla Bean Paste (or Extract)

Instructions:

  • Add to thermomix bowl all ingredients.
  • Cook for around 20 min/varoma/speed 1 (longer if you want thicker)- yummo!
  • Blend for around 30 seconds / speed 4 if you want it smooth – quick, easy, DELICIOUS! Store in a sterilised glass jar in the fridge and with this quantity of sugar, will keep well for 1 month+ (if it lasts that long!)
* Makes 1 small jar


This jam, of course, is a total hit with The Boy. He has enjoyed slathering gobs and gobs of it onto the scones that I've made to go with it for a lovely Devonshire Tea. I have even made a (very amateur) video on it, which I will link below.


If you decide to make this, with or without the Thermomix (though I don't know how without - probably plenty of standing and stirring!), do let me know. Be sure to post pictures for me to see either on Instagram or on my Daz In The Kitchen Facebook page.


© This work is copyrighted to Invest-Ex and Destiny's Fortunes Pty Ltd

Find me around SOCIAL MEDIA:
Cooking blog: http://dazinthekitchen.blogspot.com.au/
Facebook: http://www.facebook.com/dazinthekitchen
Twitter: @langshipley https://twitter.com/langshipley
Instagram: @langshipley http://instagram.com/langshipley
Pinterest: https://pinterest.com/langshipley/
Youtube channel: http://www.youtube.com/user/langshipley
Makeup and beauty blog: http://langshipley-deannasworld.blogspot.com.au/


Sunday, August 19, 2012

My best banana bread yet ... in the Thermomix


Each weekend, I buy bananas for the following week. I usually eat two bananas each day, one for breakfast and one for morning tea, or if I don't feel like it at morning tea, then I save it for afternoon tea.

This week, in my zeal to buy bananas, I did not count how many I needed and ended up buying too many. 4 too many to be exact.

I like my bananas still slightly green and once it starts to have brown spots on them, they become too ripe for me to eat. This happened this week on Thursday, so by Friday morning, I could not eat my remaining bananas.

Anyway, I have previously posted a banana bread recipe which I thought turned out OK but to be honest, I suck at baking and that was possibly the third or fourth banana bread recipe I had tried and while it was quite good, it wasn't perfect. Problem is, because I suck as baking, I don't actually know how to make the recipe better.

This time I asked a girlfriend if she had a good recipe and she pointed me to this one which she said she had made and turned out well. Now, I take that with a pinch of salt because she's a FANTASTIC baker and makes the most delicious baked goods. In fact, she's even thinking of starting her own bakery - she's THAT good!

After I looked at the recipe, I thought, what if I made this in the Thermomix? So I rang, my other girlfriend, the one who is a wizz with her Thermomix (she's my go to girl whenever I have a Thermomix question) and asked her how to change the recipe into a Thermomix one.

After about 20 minutes on the phone, this is the RECIPE that I ended up with:

Ingredients:
  • 1/2 cup butter softened
  • 1 cup sugar 250g
  • 2 eggs, beaten
  • 4 bananas, broken into small pieces
  • 1 1/2 cups flour
  • 1 teaspoon baking soda
  • 1/2 teaspoon salt
  • 1/2 teaspoon vanilla

Directions:
  • Add sugar and grind on speed 9 for 5 - 10 seconds
  • Cream together butter and sugar and eggs on speed 7 for 8 seconds
  • Add crushed bananas and vanilla
  • Sift together flour, soda and salt and add to bowl
  • Then mix on speed 6 for 10 seconds
  • Pour into greased and floured loaf pan
  • Bake at 160 degrees Celsius for 40 minutes in a greased loaf tin, then check every 10 minutes until cooked
  • *Cook only for 30 minutes if in muffin tray

This is baking, so I'm paranoid and I did not do anything different.


That said, instead of baking everything in a loaf tin, I put the banana bread batter into individual serves in little muffin trays so that I would have single serve banana breads. This recipe made 8 mini banana breads.

This recipe turned out to be by far the best of all my previous attempts. The Boy loved it and his words were "The other ones weren't bad, by this is a lot, lot, lot better". I'm happy when he's happy. :-) I guess this will be the recipe that I am going to be using moving forward.

© This work is copyrighted to Invest-Ex and Destiny's Fortunes Pty Ltd

Thursday, August 9, 2012

Hummus .... a great dip and all around yummy


There's not much cooking going on this week since we had lots of leftovers from the beef and cheese macaroni casserole from the weekend and The Boy being out one night, me being out another. On top of that, The Boy is away for the next 3 days which means I won't bother to cook much until he gets home.

So rather than posting what I've been cooking, I thought I'd drag out a recipe from a good friend who makes the most delicious hummus.

I absolutely love this recipe. I think it's the garlic and the paprika that she includes in the recipe that makes it so tasty.

Here's the very simple RECIPE for it:

Ingredients:
  • 1 can of chick pea
  • 4 tbsp tahini
  • 1-2 small garlic
  • 1 or 1/2 tsp salt
  • 1/2 lemon juice
  • Some paprika
  • 1/4 tsp ground cumin
  • 1/2 c good olive oil (More if needed)

Instructions:
  • Add ingredients into food processor and blend until smooth.

That's it. Blend and dig in!

© This work is copyrighted to Invest-Ex and Destiny's Fortunes Pty Ltd

Wednesday, July 25, 2012

Microwave chocolate chip cookie in a cup


Anyone who knows my cooking, knows that I suck baking, so imagine my delight when I found this recipe on the interwebs when I googled "microwave cookie in a cup" and found this little gem. I can't remember where I found the recipe but I'm very grateful for it. If you do want to find the source, just google it. :-)

I have to admit to being somewhat dubious about the efficacy of this recipe but then again I also know nothing about baking.

I won't blather on much more because there really isn't much to say about this little recipe besides the fact that it's quick to make and very tasty. I like that it's a small single serve cookie and I think it would also be great as a dessert, warm right out of the microwave and with a scoop of vanilla ice cream.

Without further ado, here's the RECIPE:

Ingredients:
  • 1 Tablespoon Butter
  • 1 Tablespoon Granulated White Sugar (caster sugar)
  • 1 Tablespoon of firmly packed Dark Brown Sugar
  • 3 Drops of Vanilla Extract
  • Small Pinch of Kosher Salt
  • 1 Egg Yolk (discard the egg white)
  • 1/4 cup of All Purpose Flour (plain flour)
  • 2 Tablespoons of Semi Sweet Chocolate Chips

Instructions:
  • Start by melting your butter in the microwave.
  • Add sugars, vanilla and salt. Stir to combine.
  • Separate your egg and add the yolk only to your cup. Stir to combine.
  • Add flour, then stir again.
  • Add the chocolate chips, and give a final stir.
  • Cook in microwave 40-60 seconds, start checking for done-ness at 40 seconds.
  • Mine takes 60 seconds in a 1000W microwave.

Just for the record, this *is* baking, so I didn't vary the recipe ... sort of. I didn't have any granulated white sugar, so I used raw sugar instead. The cookie came out a little crunchy from that, I thought.

I did think it was a little sweet for my taste but then I think you can adjust the sweetness to taste by adding more or less sugar according to what you like.

© This work is copyrighted to Invest-Ex and Destiny's Fortunes Pty Ltd

Thursday, May 24, 2012

Chocolate covered peanut butter balls


Continuing on the theme of peanut butter and chocolate, this is something that I have been wanting to do for a while.

I first tried these chocolate covered peanut butter balls when we hosted a wine tasting evening at our apartment and the winery brought along a chef that served some delicious food that went along very well with the wine.

These little chocolatey delights were part of dessert that was served. You should have heard some of the noises people were making when they ate them. Heh!

Of course, many of us begged for the recipe and I, in turn, bugged and bugged and bugged them until the published the recipe in their newsletter. The winery have recently opened a cafe and they serve this delicious dessert there.

Here's the RECIPE for the balls:

Ingredients:
  • 1/2 cup unsalted butter
  • 2 cups rice bubbles cereal
  • 2 cups crunchy peanut butter (do not use old-fashioned style or freshly ground)
  • 2 cups dry milk powder
  • 2 cups icing sugar
  • A pinch of chilli powder (optional)
  • 425 grams dark chocolate, chopped

Instructions:
  • Line cookie sheet with foil. Melt butter in heavy small saucepan over low heat.  
  • Combine cereal, peanut butter, dry milk and powdered sugar in large bowl. Mix in butter. Moisten hands and roll tablespoon mixture into ball. Place on prepared cookie sheet. Repeat with remaining mixture. Chill overnight. 
  • Line cookie sheets with foil. Melt chocolate in double boiler over low heat, stirring occasionally. Remove chocolate from over water. 
  • Using fork, dip peanut butter balls at a time into chocolate and transfer to prepared cookie sheets. Refrigerate until chocolate is firm. (Can be prepared week ahead. Refrigerate in airtight container.) 

The only thing that I did differently to the recipe (because I always do) is that I added the chili (and quite a lot of it - I used about a teaspoon) into the melted chocolate that coated the peanut butter balls so that could get that hint (kick!) of chili when I bit into the little chocolatey peanut buttery delight. :-)

If you keep them in an airtight container in the fridge, it will keep for up to a week, possibly a little more, if you have a really good fridge. 

ps. Can you tell I have Internet and my blogging mojo back??


© This work is copyrighted to Invest-Ex and Destiny's Fortunes Pty Ltd

Wednesday, May 23, 2012

Afternoon snack ... chocolate


Friends who know me will know that I am rather fond of chocolate.

This is my latest discovery  - the Reese's Dark Chocolate Peanut Butter Cups.

NOT the milk chocolate ones but the DARK chocolate ones, because I like dark chocolate.

The bittersweet taste of dark chocolate along with the slightly salty flavor of the peanut butter is just delightful.

Each pack comes with two cups, which is just the best amount for an afternoon snack. Yum!


© This work is copyrighted to Invest-Ex and Destiny's Fortunes Pty Ltd

Tuesday, May 22, 2012

Best Gyoza ever!! ... and this is a test


This is not really a real post. For those of you who use Blogger, you’ll know that Blogger has recently switched to a new user interface.

It reeks!

For some unknown reason, the HTML section for writing a post now will no longer capture line breaks when text is copied into it. It’s rather sad ... for me, that is. My nicely formatted paragraphs of text looks like someone vomited up a whole bunch of words onto the page. I’m sure there’s some uber technical reason why it now no longer supports line breaks when it used to before but I just don’t know what it is.

Sometimes “new” is not “better”, Google!!

Anyhow, I’m testing out to see what would happen to my formatting were I to email myself this post. If it’s awful, I might just delete it, if it’s passable, I’ll leave it up.

So yes, this is a test.

That said, I’ve discovered the best gyoza that I’ve ever eaten. It’s quite possible that there is better gyoza out there, but this gyoza is pretty darn good.

I get the gyoza at a restaurant close to where I work. The place is called Hokkaido and I might have talked about it previously (trying to think when) – possibly when I first discovered it … ah yes, here.

Anyhow, their gyozas are just the right amount of chewy and crunchy, and extremely tasty. Best eaten while still warm.

I definitely recommend trying them out.


© This work is copyrighted to Invest-Ex and Destiny’s Fortunes Pty Ltd

Monday, February 27, 2012

Naughty snacks


After that exceedingly unsatisfying lunch, I felt the need to treat myself. I wandered into the IGA grocery store attached to the food court and raided their candy section. Ended up with these.

I can't decide whether to eat them or not. I'm not really that hungry.

Right now, they are sitting on my desk, staring at me.

© This work is copyrighted to Invest-Ex and Destiny’s Fortunes Pty Ltd

Wednesday, February 8, 2012

Pepperoni pizza puffs

I have recently been introduced to Pinterest by a friend of mine. I was warned that it would be a complete time suck and I signed up anyway, just 'cos there were things there that I really liked the look of.

Upon my first moments of browsing the site, I came across a recipe for Pepperoni Pizza Puffs that looked really delicious and quite easy to make. Also as it happens, The Boy was having some work people over to the apartment for drinks that afternoon and I thought "hmmm... I could make those!" and I did. They turned out to be very tasty and as one of the guys said, "these are very more-ish".


I can't recall where the original recipe came from now, so I apologies into the ether which is the Internet to the person I got this recipe from. I do acknowledge that I got it from you. *sending "thank you" thoughts*

Anyway, these are great for a snack, for a party or just frozen to pull out and defrosted to much on while watching TV. Here's the RECIPE:

Ingredients:
  • 3/4 cup flour
  • 3/4 teaspoon baking powder
  • 1 tablespoon Italian seasoning
  • pinch of salt
  • pinch of red pepper flakes (optional)
  • 3/4 cup whole milk
  • 1 egg, lightly beaten
  • 1 cup shredded mozzarella cheese
  • 1/4 cup grated Parmesan cheese
  • 1 cup cubed pepperoni
  • 1/2 cup store-bought pizza sauce

Instructions:
  • Preheat the oven to 180 degrees C. Grease a 24-cup mini-muffin pan. In a large bowl, whisk together the flour, baking powder, Italian seasoning, salt and red pepper flakes (if using) ; whisk in the milk and egg. Stir in the mozzarella, Parmesan and pepperoni; let stand for 10 minutes.
  • Stir the batter and divide among the mini-muffin cups. Bake until puffed and golden, 20 to 25 minutes.
  • Meanwhile, microwave the pizza sauce until warmed through. Serve the puffs with the pizza sauce for dipping.

Here are some things to pay attention to:
  • The recipe made a few more than 24 mini muffins. I just used up the rest of the batter for another batch without filling up the whole pan. You can also put it into a larger muffin pan and make one large puff, if you are that way inclined.


  • The recipe says 20 - 25 minutes, but my oven runs hot, so it only took about 15 minutes. I suggest that you check early on and when it turns a lovely golden brown, then take it out of the oven. Don't leave it too long without checking, 'cos they might just end up burned.

This is the color that you want the pizza puffs to be
when you pull them out of the oven

  • I was pretty generous with the chili flakes. I put in 1/4 teaspoon and that gave the pizza puffs a real kick, which I liked.
  • I did not use pizza sauce because I didn't have any of that. Instead I used a jar of pasta sauce and that worked fine too. I also didn't warm it up and just left it at room temperature.

Munch away!!!

Do you have any favorite party munchies that you are particularly fond of? What snacks do you love that you keep going back for more? Do you like making your own snacks or do you just get them from the store?


© This work is copyrighted to Invest-Ex and Destiny’s Fortunes Pty Ltd

Sunday, February 5, 2012

Is Don, is good!


My afternoon snack for the afternoon. This is such an old fashioned snack. The Boy hates it. I guess when I was young, I saw an ad for it that said "Is Don, is good!" and it stuck. I really do enjoy it. I have strange taste sometimes. :-)

© This work is copyrighted to Invest-Ex and Destiny’s Fortunes Pty Ltd